 As a website owner, you’ve likely encountered issues like slow page load times, excessive server resource usage, or suboptimal performance that negatively impacts user experience. These problems often arise from improperly configured websites that don’t implement effective caching and optimization tools, directly affecting your business by driving visitors away and lowering search engine rankings, making it more difficult for users to find your site.
At TheBeeHost, we understand these struggles, which is why we recommend LiteSpeed Cache as an ideal performance solution for WordPress websites. Paired with our LiteSpeed WebServer-powered hosting environment, this plugin helps you achieve lightning-fast speeds, better resource management, and a stable user experience.
In this guide, we’ll explore what LiteSpeed Cache is, why it’s essential for WordPress optimization, and how you can use it to transform your website into a high-performing resource.
What Is LiteSpeed Cache?
LiteSpeed Cache (LSCache) is a powerful, all-in-one site acceleration plugin, specifically designed for websites hosted on LiteSpeed WebServer. Unlike traditional caching plugins, LSCache utilizes server-level caching, making it faster and more efficient. It not only reduces page load times but also optimizes various aspects of your website for peak performance.
Why Use LiteSpeed Cache?
LiteSpeed’s built-in server-level cache (LSCache) is a powerful and highly customizable caching solution designed to optimize website performance.
With LSCache, you can achieve the following benefits:
- Dramatically reduce page load times – By serving pre-cached content, LSCache significantly cuts down the time required to load web pages, providing a faster and smoother experience for visitors.
- Provide an exceptional user experience – A faster website keeps users engaged, reduces bounce rates, and boosts satisfaction, ultimately improving your site’s credibility and user retention.
- Handle traffic spikes with ease – LSCache efficiently manages high volumes of traffic without compromising site performance, making it ideal for websites experiencing sudden surges in visitors.
- Manage cache with minimal effort – LSCache offers powerful Smart Purge technology, which intelligently clears outdated cache so that your visitors always see the most up-to-date content while keeping administrative tasks simple.
Steps to Optimize Your WordPress Website with LiteSpeed Cache
Step 1: Install and Activate the LiteSpeed Cache Plugin
You can activate LiteSpeed Cache on your website using either cPanel or WordPress.
Option 1: Install via cPanel
- Log in to your cPanel.
- Navigate to Advanced >> LiteSpeed Web Cache Manager.
- Scroll down to the Cache Management Area and click on WordPress Cache.
- In the WordPress Cache interface, click the Scan button to detect all your existing WordPress installations.
- Once the scan is complete, select your desired WordPress installation and click the Enable button next to it.
- LiteSpeed Cache will now be installed and activated on your website.
Option 2: Install via WordPress Admin Dashboard
- Log in to your WordPress Admin Dashboard.
- Navigate to Plugins >> Add New.
- In the search bar, type LiteSpeed Cache.
- Locate the LiteSpeed Cache plugin, click Install Now, and then click Activate.
Step 2: Configuring LiteSpeed Cache Settings
1. General
i. General Settings
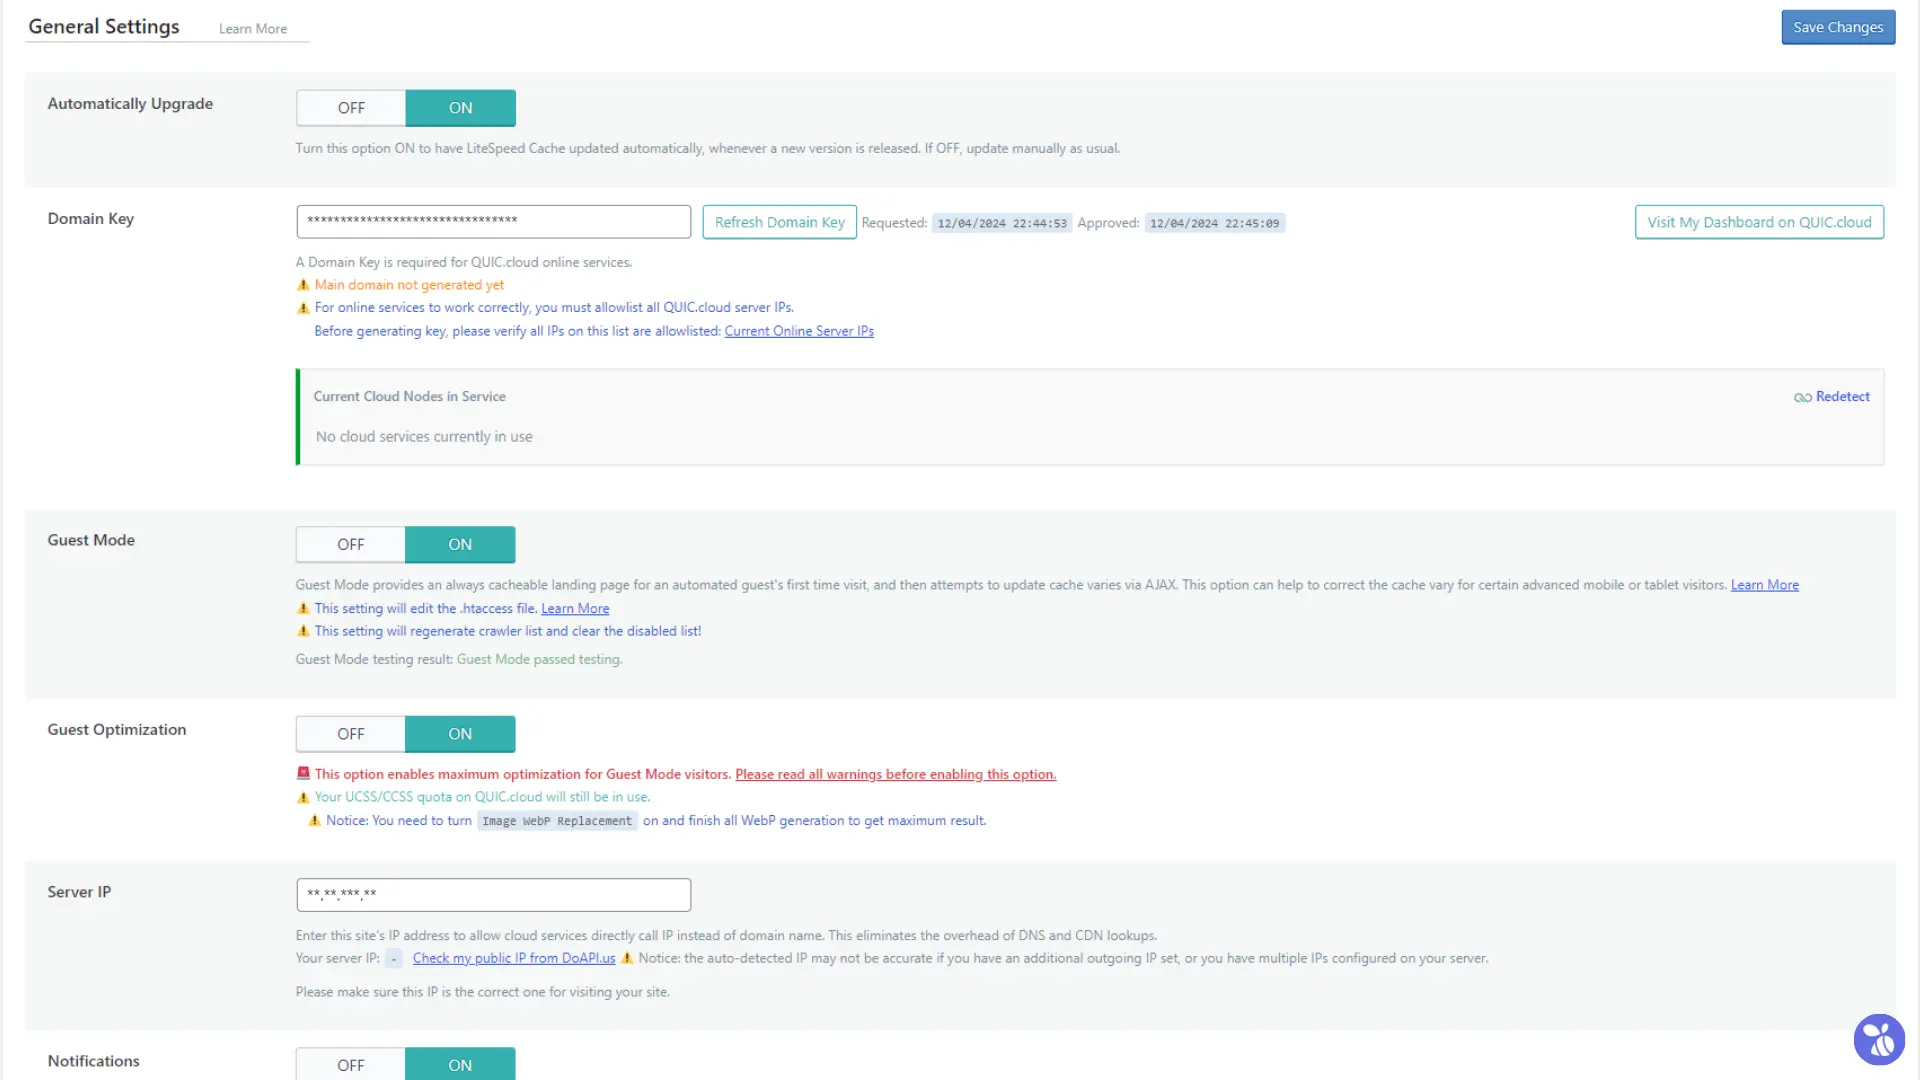 The General Settings allows you to enable core features and integrate with LiteSpeed’s QUIC.cloud services.
QUIC.cloud is the first and only complete WordPress optimization solution, featuring a global Content Delivery Network (CDN), Image and Page Optimization services, and more.
- Automatically Upgrade
Keep this option enabled so that the LiteSpeed Cache plugin updates automatically with the latest features, fixes, and security improvements. - Domain Key (Link to QUIC.cloud)
To use advanced optimization services (e.g. image optimization, critical CSS, and QUIC.cloud CDN), you’ll need to obtain and enter a Domain Key. Click the Request Domain Key button in this section, and LiteSpeed will automatically link your domain to QUIC.cloud. - Guest Mode
Enabling Guest Mode allows LiteSpeed Cache to serve pre-cached pages instantly to first-time visitors who are not logged in. This improves page load times for new users. - Guest Optimization
When Guest Optimization is enabled, additional optimizations, like deferred JavaScript loading and critical CSS, can be applied for guest users. Combined with Guest Mode, this results in a seamless experience for new visitors. - Server IP
Enter the IP address of your server if it’s not automatically detected. This step is particularly useful for QUIC.cloud integration to ensure caching works correctly. - Notifications
Turn on notifications to receive updates and important alerts regarding LiteSpeed Cache. This will keep you informed about new features, cache purges, or plugin upgrades.
ii. Tuning
In the Tuning Settings, we have the following options:
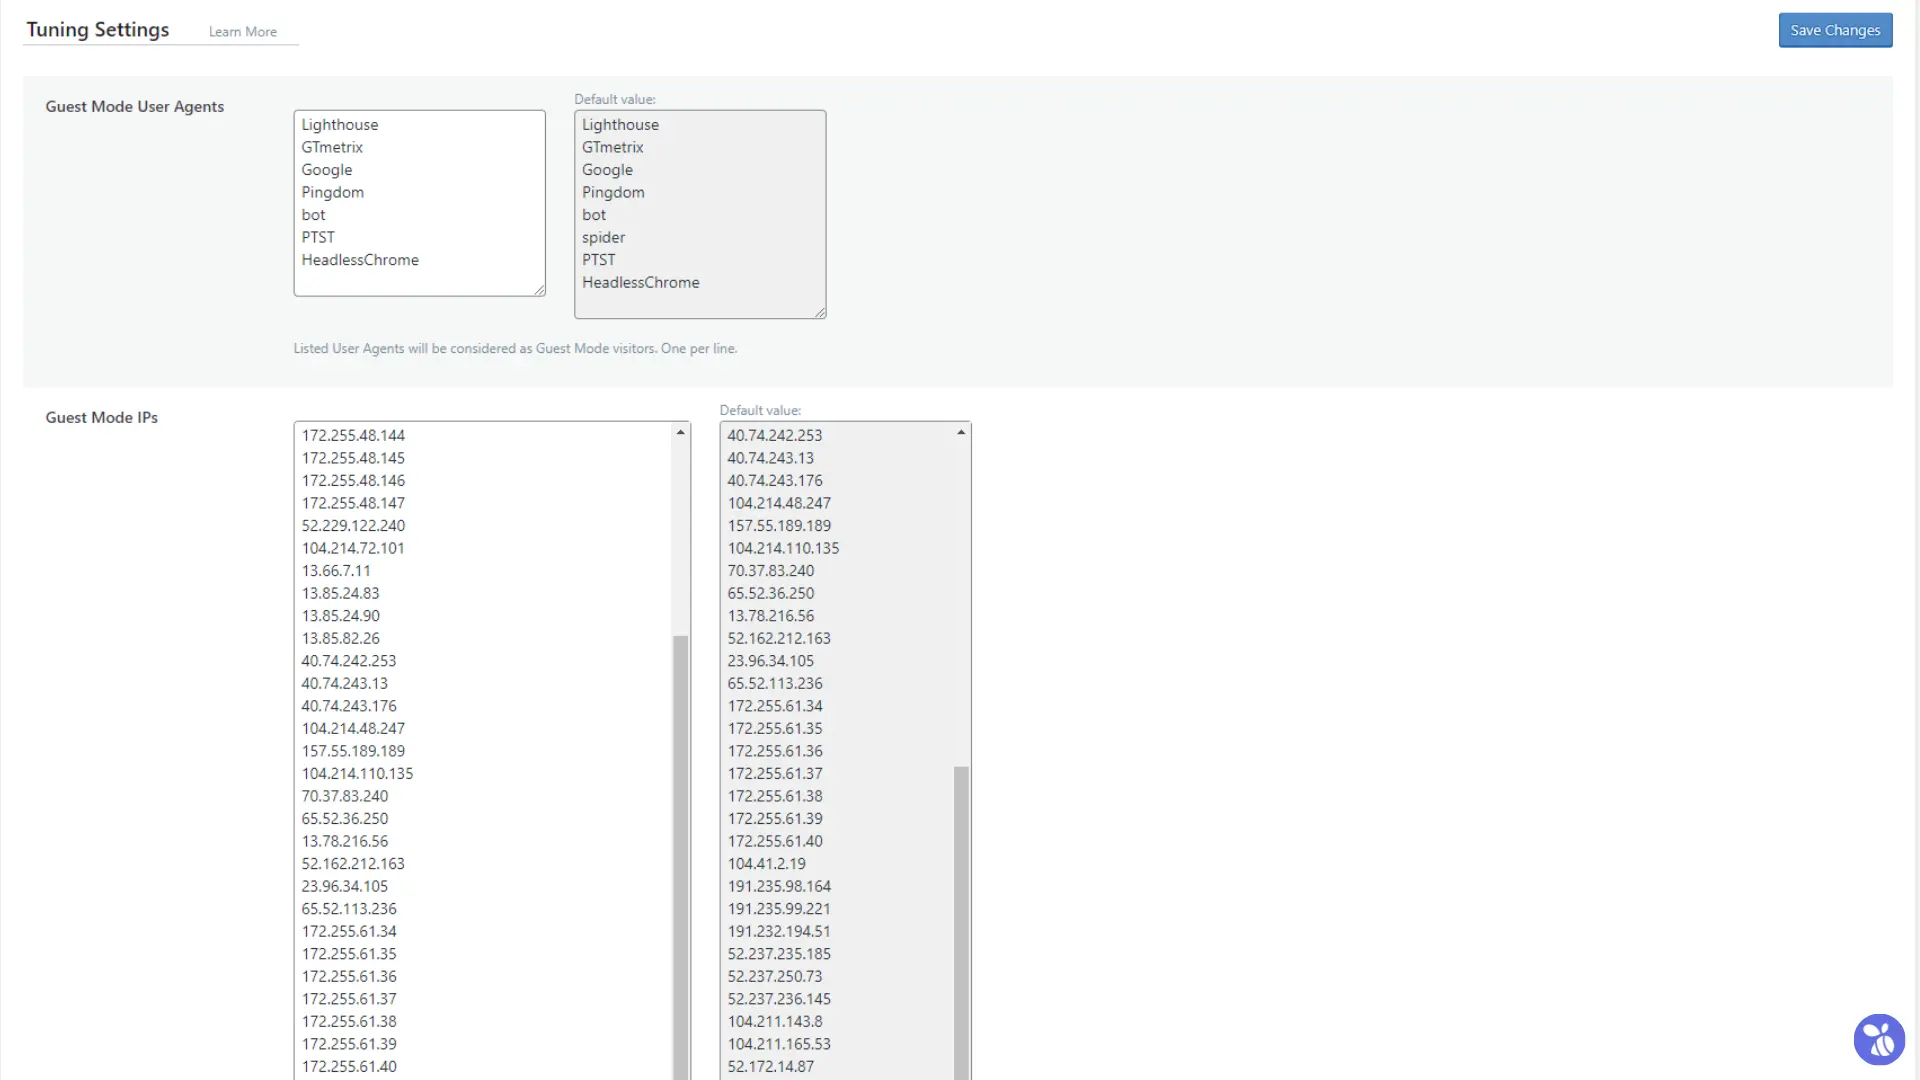
- Guest Mode User Agents
This field allows you to specify user agents (e.g. browsers, bots, or specific devices) that will always be treated as guest visitors by the caching system. This option is useful for scenarios where specific user agents need to be treated differently. - Guest Mode IPs
This field lets you define specific IP addresses that will always be considered as guest visitors, regardless of whether they are logged in or not. This is typically used to ensure consistent guest behavior for specific users or devices by their IP.
Both fields are pre-configured with optimal settings. You don’t need to make any changes unless you have specific requirements for custom user agents or IP addresses.
2. Cache Settings
i. Cache
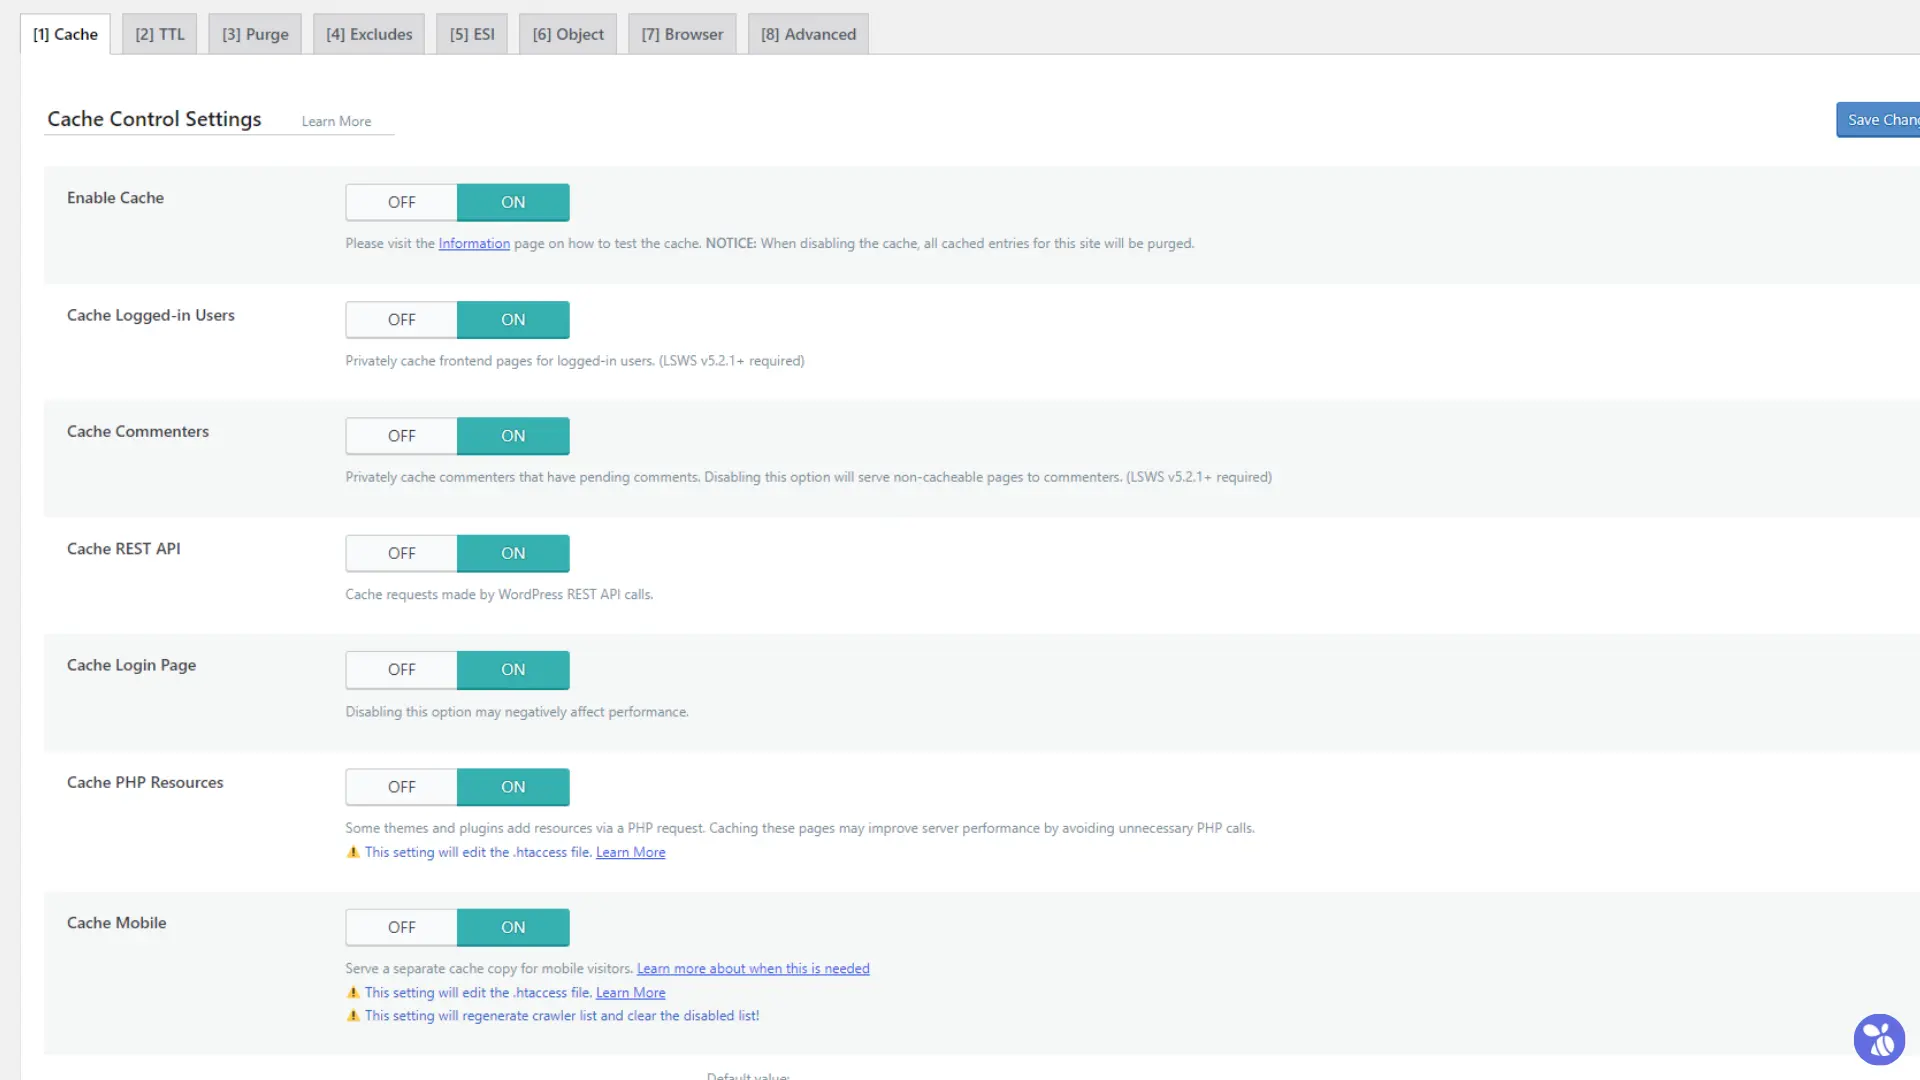
- Enable Cache: This must be turned ON to activate the caching functionality, which is the core of LiteSpeed Cache.
- Cache Logged-in Users: When enabled, it allows caching for logged-in users. Ideal for membership or subscription sites.
- Cache Commenters: Caches pages for users who leave comments, improving performance without affecting interactivity.
- Cache REST API: Enables caching for REST API requests, which helps improve the speed of API-driven functionalities.
- Cache Login Page: Caches the WordPress login page to reduce server load, which is especially useful during brute-force attacks.
- Cache PHP Resources: Caches dynamic PHP-generated content where possible. Some themes and plugins add resources via a PHP request. Caching these pages may improve server performance by avoiding unnecessary PHP calls.
- Cache Mobile: Allows caching for mobile devices. Leave this enabled unless you use a separate mobile theme.
- List of Mobile User Agents: Specify the user agents for which mobile-specific caching rules will apply.
- Private Cache URIs: Define specific URLs that should only have private caches, e.g. user-specific dashboards.
- Force Cache URIs: Add URLs you want to ensure are cached, regardless of other settings.
- Force Public Cache URIs: Force specific URLs to be cached and served publicly to all visitors.
- Drop Query String: Configure how query strings in URLs should be handled, useful for avoiding duplicate cache entries.
ii. TTL
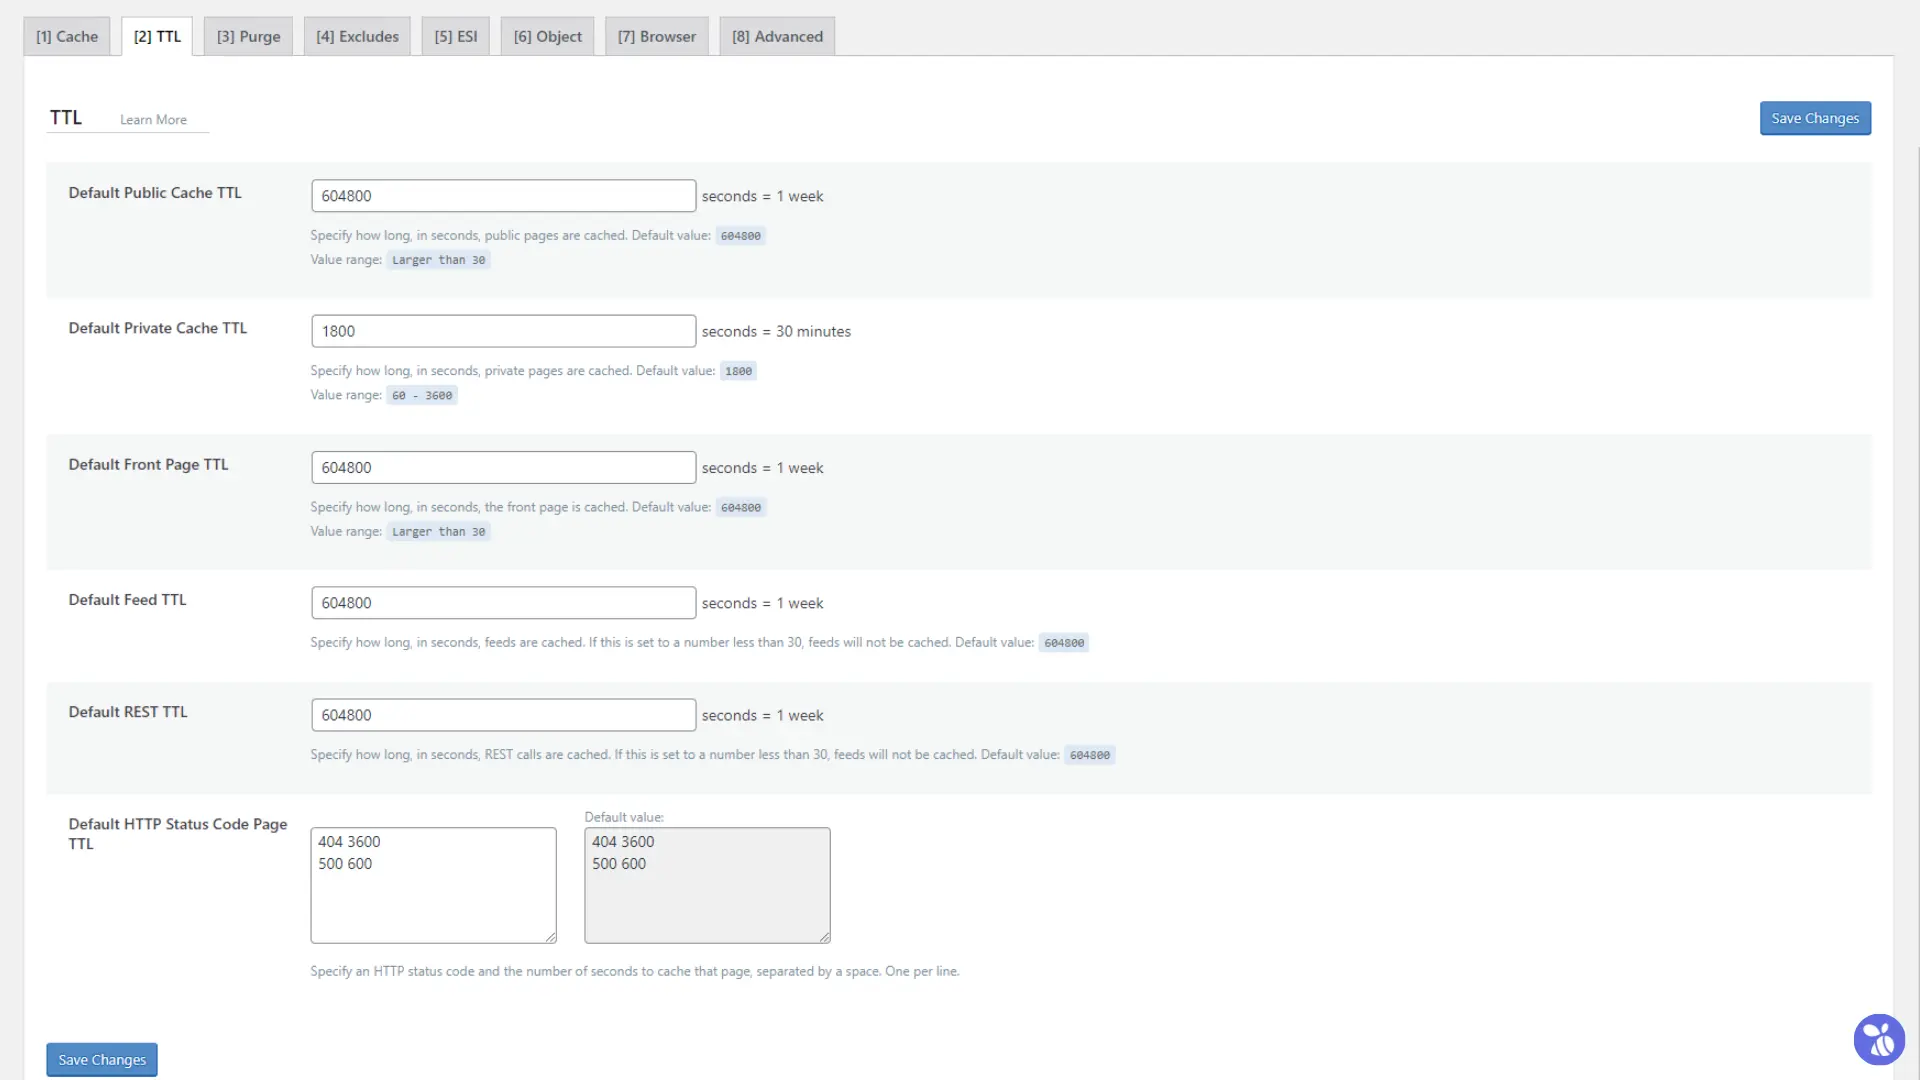
- Time To Live (TTL) defines how long cached content remains valid before being refreshed. Each content type (e.g. home page, category pages) can have a separate TTL setting.
You can leave these settings as they are unless you have specific requirements.
iii. Purge
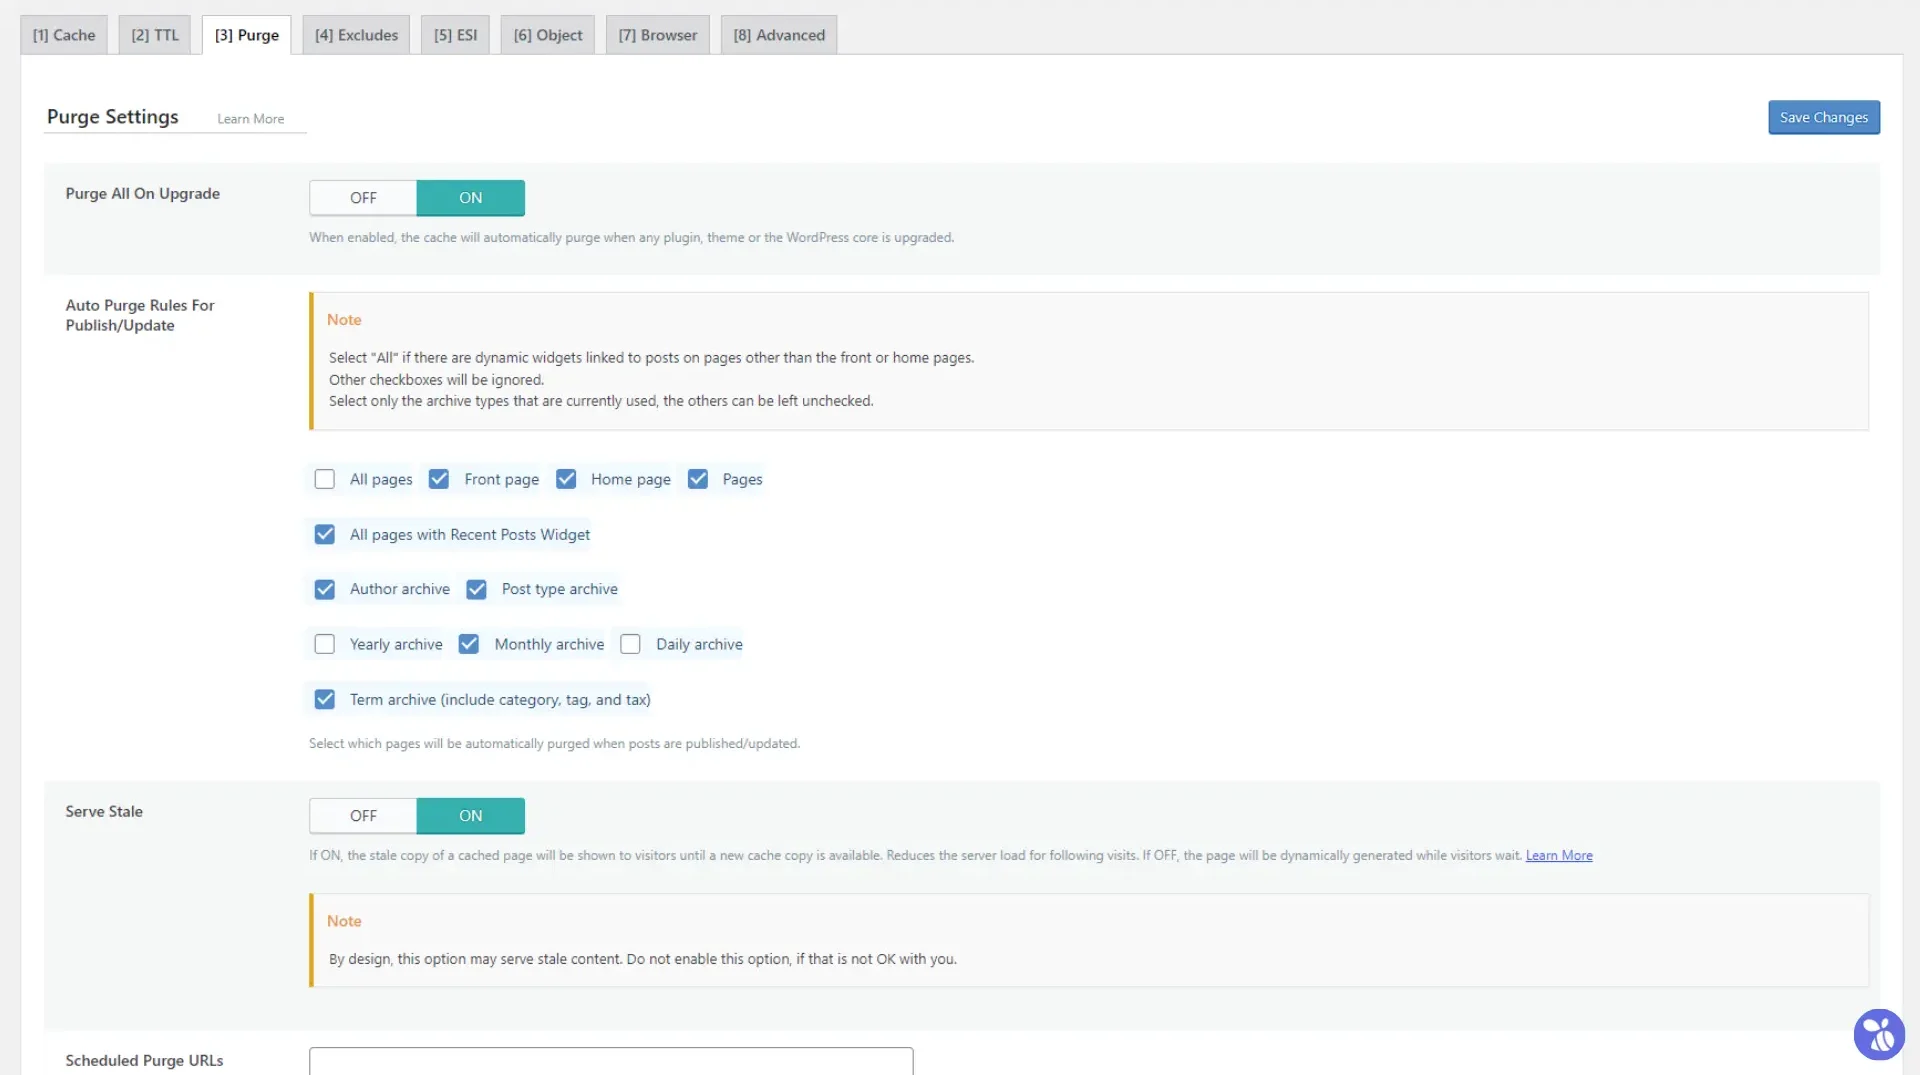
- Purge All On Upgrade: Clears all cache automatically when you update the LiteSpeed Cache plugin.
- Auto Purge Rules For Publish/Update: Automatically purges related caches when content (e.g. posts, pages) is updated or published.
- Serve Stale: Delivers stale (old) cached content while a new cache is being generated, ensuring continuous availability.
- Scheduled Purge URLs: Define specific URLs that should be purged (cleared) at scheduled times.
- Scheduled Purge Time: Set the exact time for scheduled cache purges.
- Purge All Hooks: Triggers cache purges based on specific WordPress hooks or actions.
Leave these settings on default unless there are advanced requirements.
iv. Excludes
- Do Not Cache URIs: Define specific URLs you don’t want to be cached, such as admin pages.
- Do Not Cache Query Strings: Prevent caching for URLs with specific query strings. Useful for dynamic content.
- Do Not Cache Categories: Avoid caching specific category archive pages.
- Do Not Cache Tags: Exclude tag archive pages from caching.
- Do Not Cache Cookies: Prevent caching when specific cookies are present, often used for dynamic content or user sessions.
- Do Not Cache User Agents: Exclude caching for certain user agents (e.g. bots or testing tools).
- Do Not Cache Roles: Disable caching for specific user roles, such as administrators or editors.
These settings can remain at their default values for most users.
v. ESI
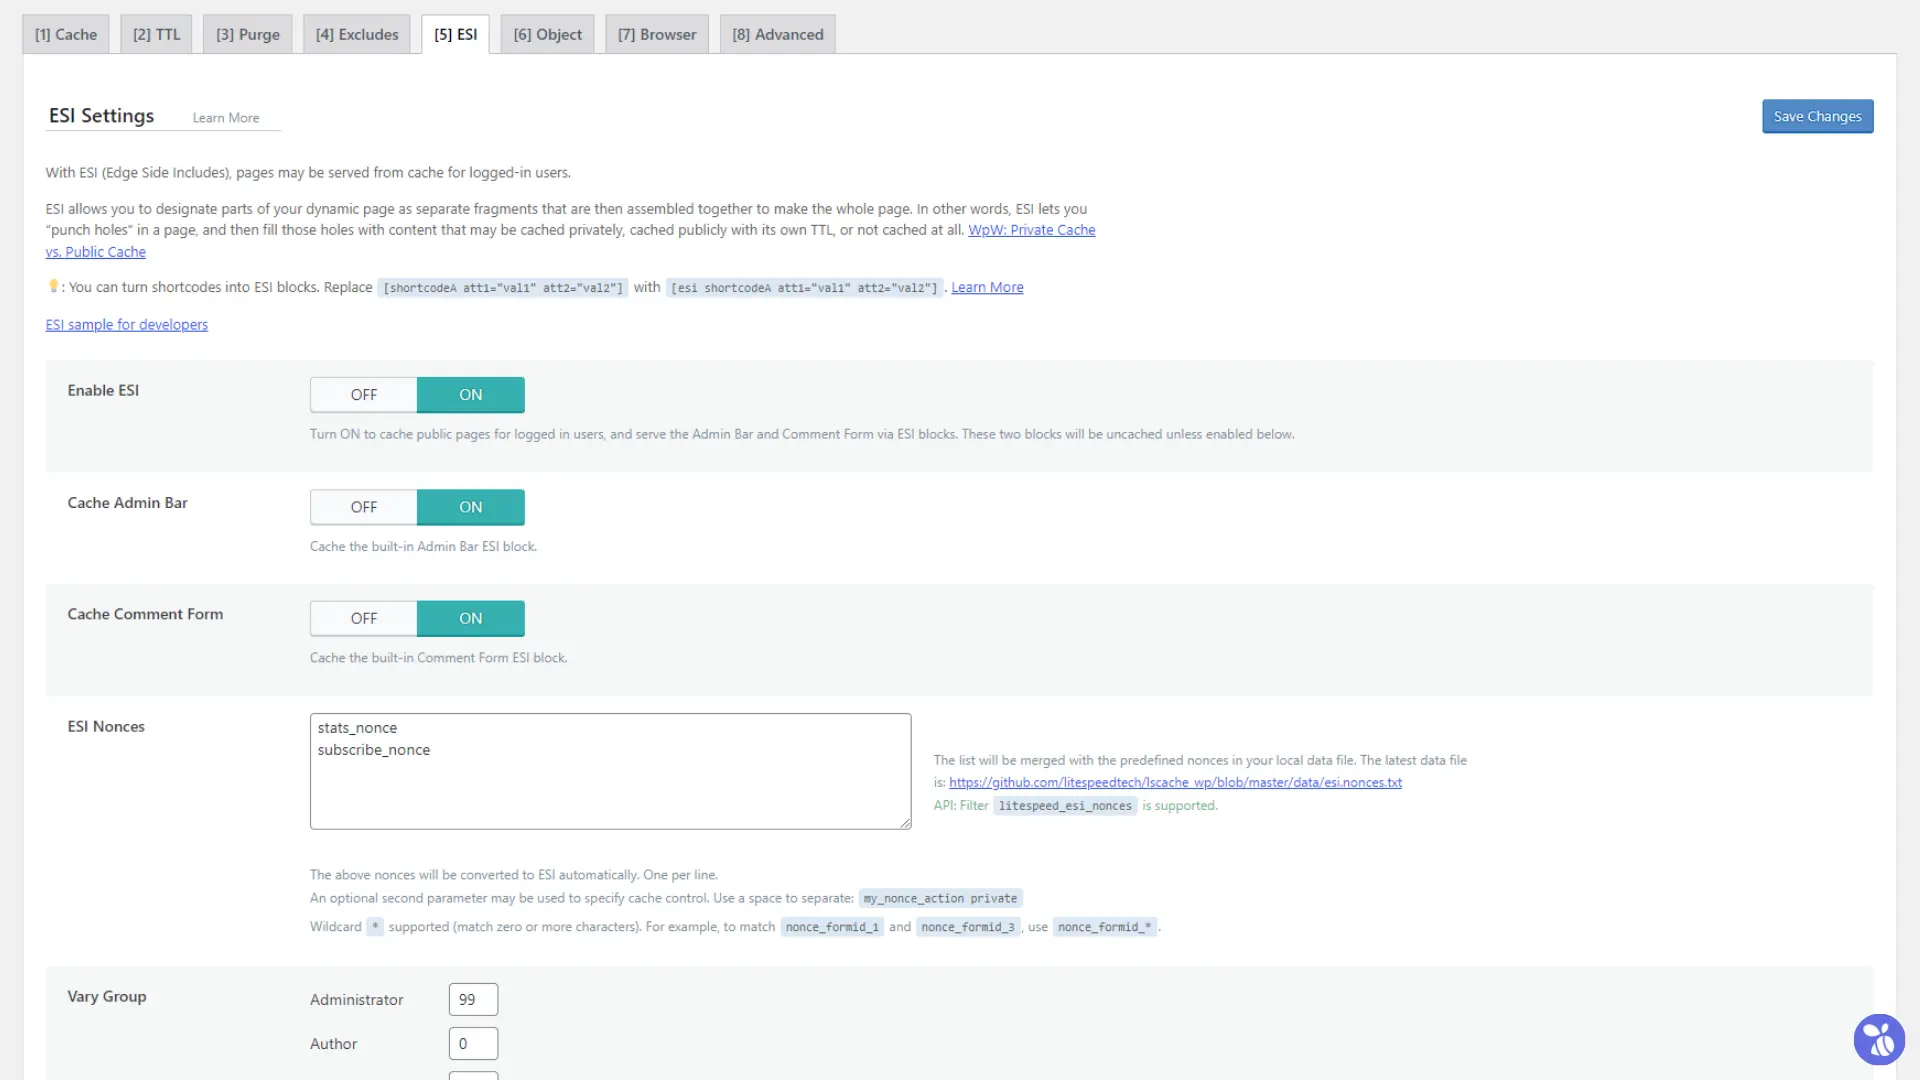
- Enable ESI: Turn this ON to enable Edge Side Includes, which allows partial caching for dynamic elements.
- Cache Admin Bar: Leave this ON to cache the admin bar for logged-in users, improving performance.
- Cache Comment Form: Turn this ON to cache the comment form while allowing dynamic content updates.
- ESI Nonces: Nonces are security tokens. Leave these settings at their default values to ensure functionality.
- Vary Group: Used for advanced configurations to separate cached content by user groups. Keep at default unless required.
vi. Object Cache
Object caching is a method of storing database query results in memory. It improves performance by reducing the need to fetch the same data repeatedly from the database. By enabling Object Caching, you can achieve faster page load times and reduced server resource usage, ensuring a smoother experience for your visitors.
For detailed instructions on setting up object caching on your website, please refer to this guide: Enable Object Caching on Your WordPress Website.
vii. Browser
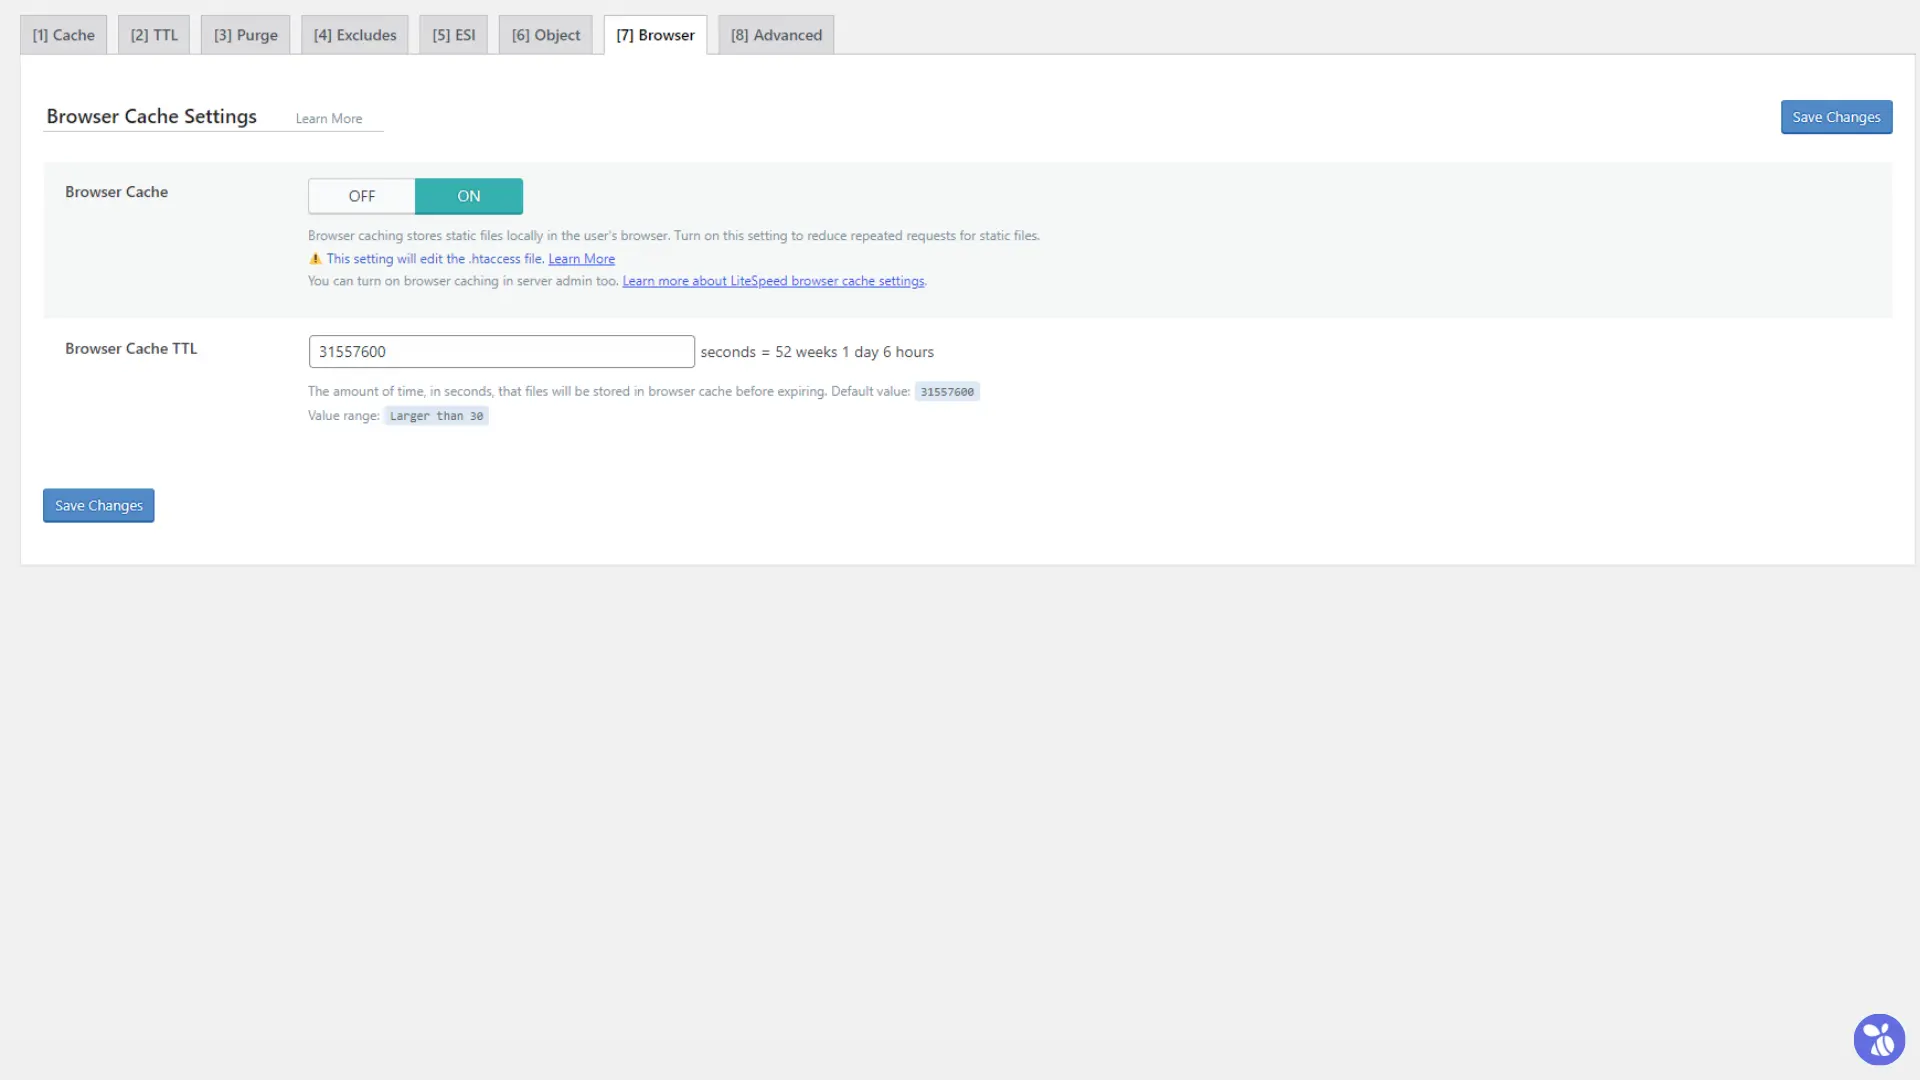
- Browser Cache: Turn this ON to enable browser-level caching, which allows visitors’ browsers to store cached assets for faster reloads.
- Browser Cache TTL: Defines how long the browser should store cached assets. You can leave this at its default value.
viii. Advanced
- AJAX Cache TTL: Sets the cache duration for AJAX requests.
- Login Cookie: Used for logged-in user sessions.
- Vary Cookies: Handles variations in cache content based on cookies.
Keep these at default unless specified to avoid unintended issues.
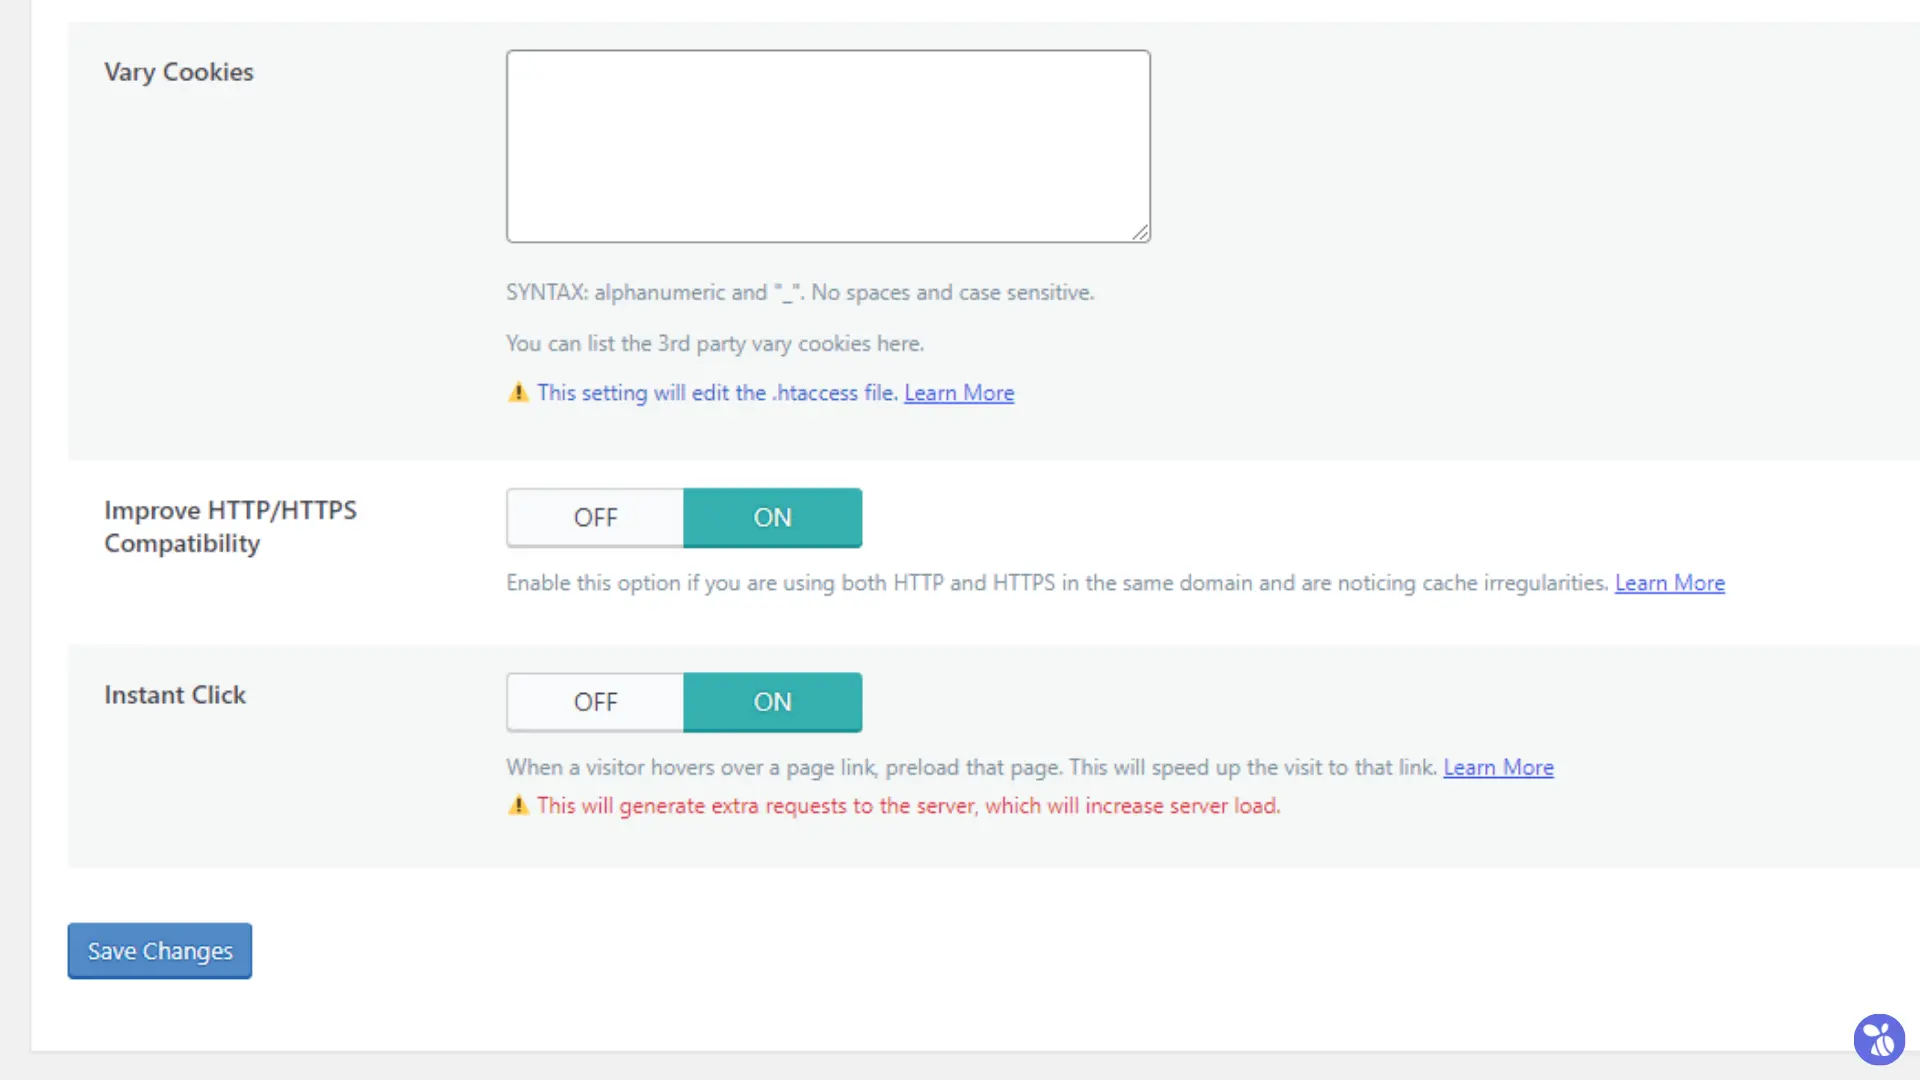
Improve HTTP/HTTPS Compatibility: Turn this ON to ensure smooth operation across both HTTP and HTTPS protocols.
Instant Click: Turn this ON to prefetch links as the user hovers, resulting in faster-perceived page loads.
3. Page Optimization
Page optimization is a crucial aspect of website performance, focusing on reducing page load times and improving user experience. The Page Optimization section in LiteSpeed Cache provides tools to optimize CSS, JavaScript (JS), HTML, media, and other resources. By fine-tuning these settings, you can achieve better speed scores on tools like GTmetrix, Pingdom, and Google PageSpeed Insights.
i. CSS Settings
The CSS Settings in the LiteSpeed Cache plugin allow for advanced CSS optimization. Here’s an explanation of each setting, along with recommendations for optimal performance:
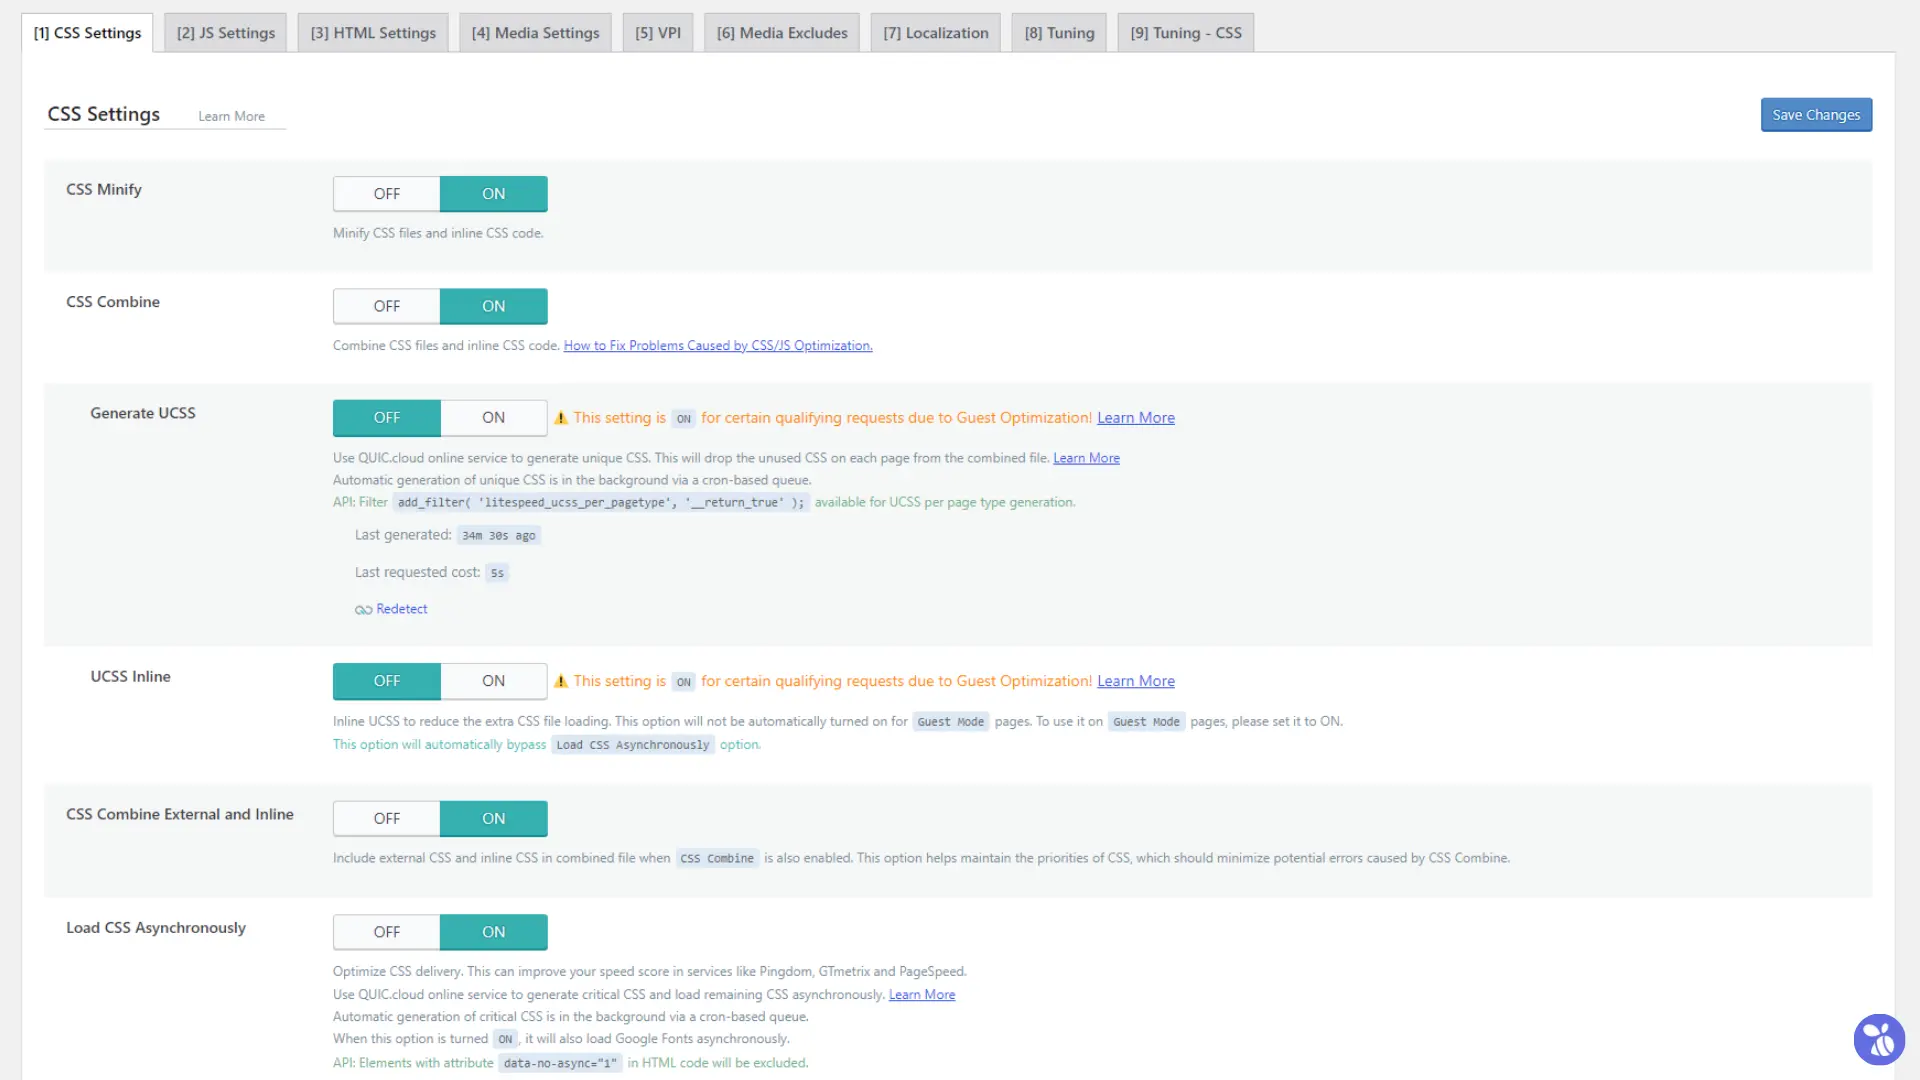
- CSS Minify
Minifies CSS files and inline CSS by removing unnecessary characters, like spaces and comments, without affecting functionality.
Recommended Setting: ON
Minification reduces file size, leading to faster loading times.
- CSS Combine
Combines multiple CSS files and inline CSS into a single file.
Recommended Setting: ON
Combining reduces the number of HTTP requests, improving load speed.
- Generate UCSS (Unused CSS)
Uses QUIC.cloud’s online service to generate unique CSS by removing unused styles from the combined CSS file.
Recommended Setting: OFF (for low-resource servers), ON (if server resources are sufficient)
Generating UCSS can consume server resources, as it runs in the background using a cron-based queue. It’s best to turn this OFF if your hosting environment has resource limitations.
- UCSS Inline
Inlines UCSS directly into the HTML to reduce the need for an extra CSS file.
Recommended Setting: OFF
Inline UCSS may increase HTML file size and is generally not resource-efficient for low-resource environments.
- CSS Combine External and Inline
Combines both external CSS and inline CSS into a single file, ensuring proper CSS priority and reducing potential errors.
Recommended Setting: ON
This maintains CSS priorities while optimizing the number of requests.
- Load CSS Asynchronously
Optimizes CSS delivery by loading critical CSS first and the rest asynchronously.
Recommended Setting: ON
Improves page speed scores on tools like GTmetrix, PageSpeed Insights, and Pingdom. This also loads Google Fonts asynchronously when enabled.
Note: Critical CSS is generated in the background using a cron-based queue which can strain resources. Turn this OFF if your server has limited processing power.
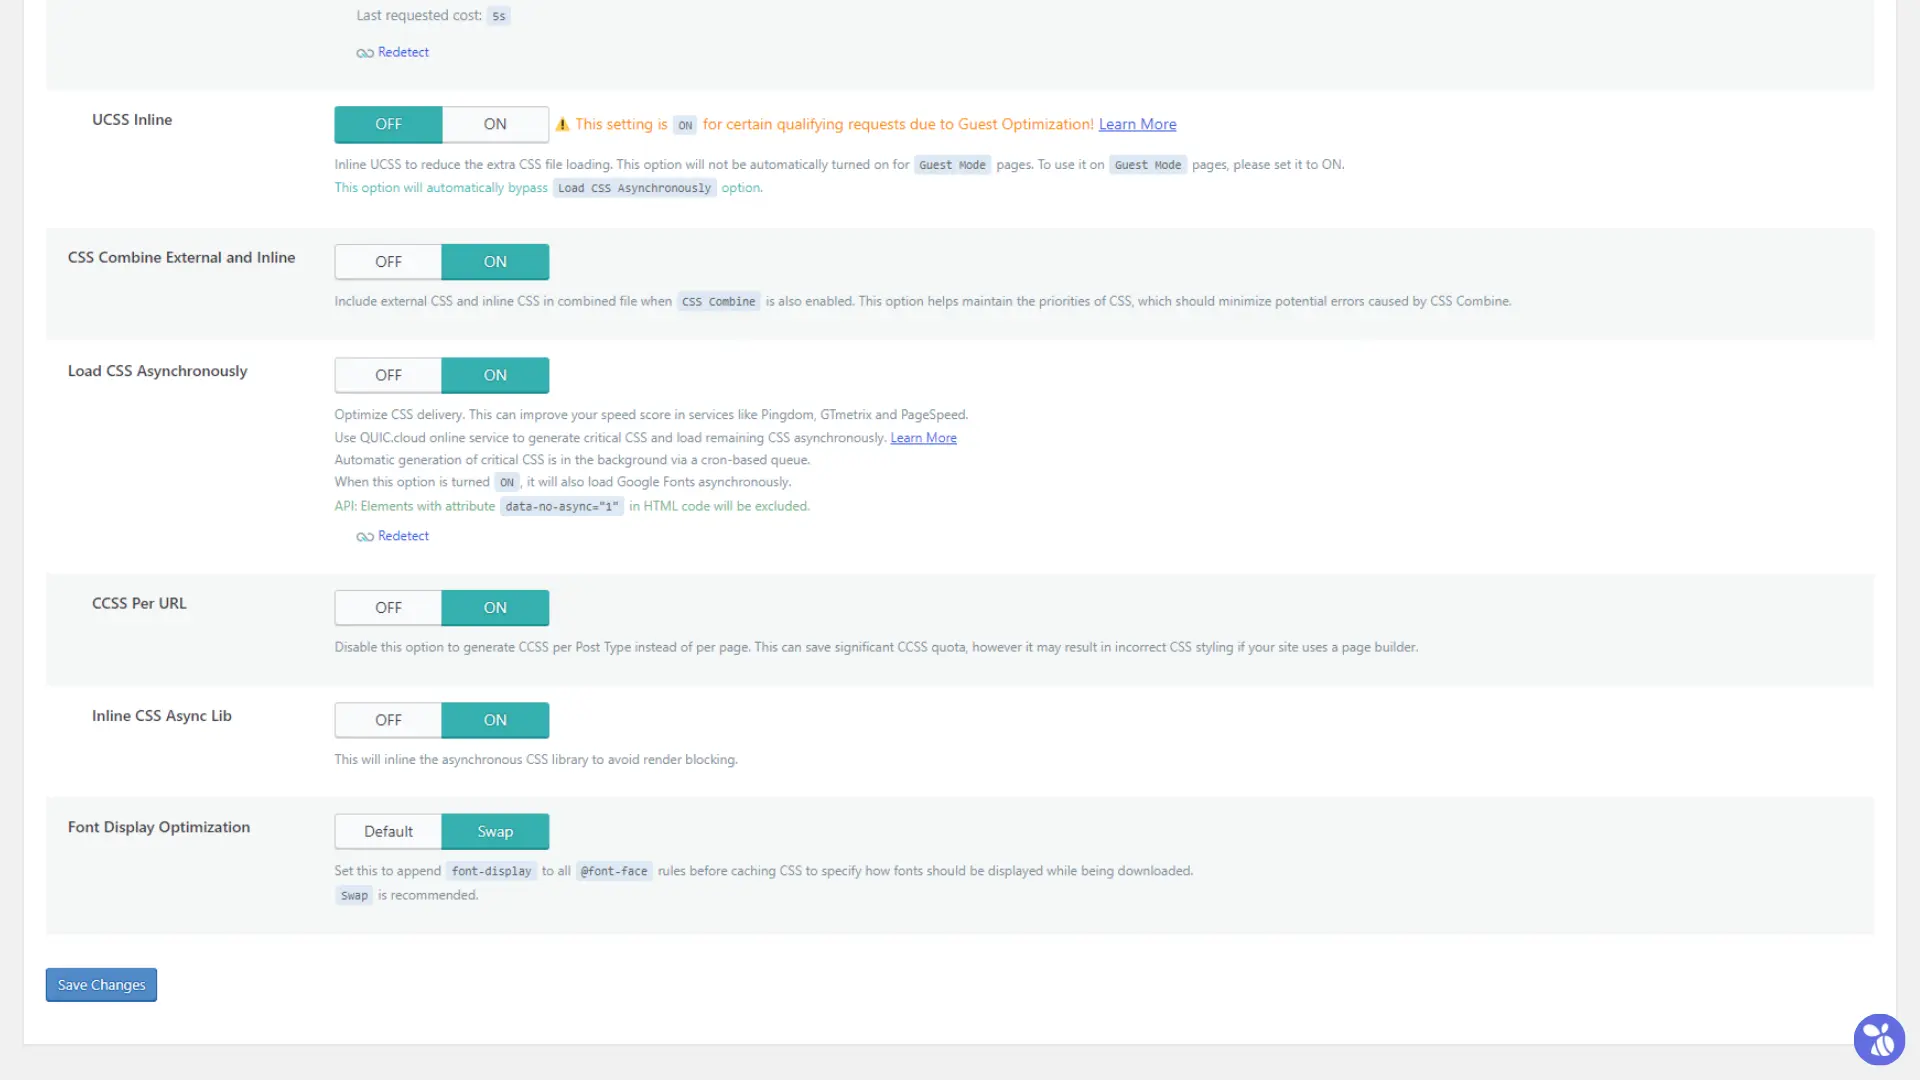
- CCSS Per URL
When enabled, this option generates Critical CSS (CCSS) individually for each page. Disabling it generates CCSS for an entire Post Type, meaning all posts or pages of the same type will share the same CCSS file.
Recommended Setting: ON
Keep this option enabled to ensure accurate styling across pages, especially if your site uses a page builder or has custom layouts.
Caution: Disabling it can save CCSS quota by reducing the number of unique CCSS files generated but may cause styling issues on pages with unique designs or layouts within the same Post Type.
- Inline CSS Async Lib
Inlines the asynchronous CSS library to avoid render-blocking during page load.
Recommended Setting: ON
This is lightweight and helps prevent render-blocking CSS.
- Font Display Optimization
Appends the font-display property to all@font-facerules to specify how fonts should be displayed during download.
Recommended Setting: Swap
The “Swap” value improves the user experience without consuming extra resources.
ii. JS Settings
The JavaScript (JS) Settings allow you to optimize the delivery and execution of JavaScript files on your website. Proper configuration of these options can significantly improve performance, particularly in Core Web Vitals metrics.
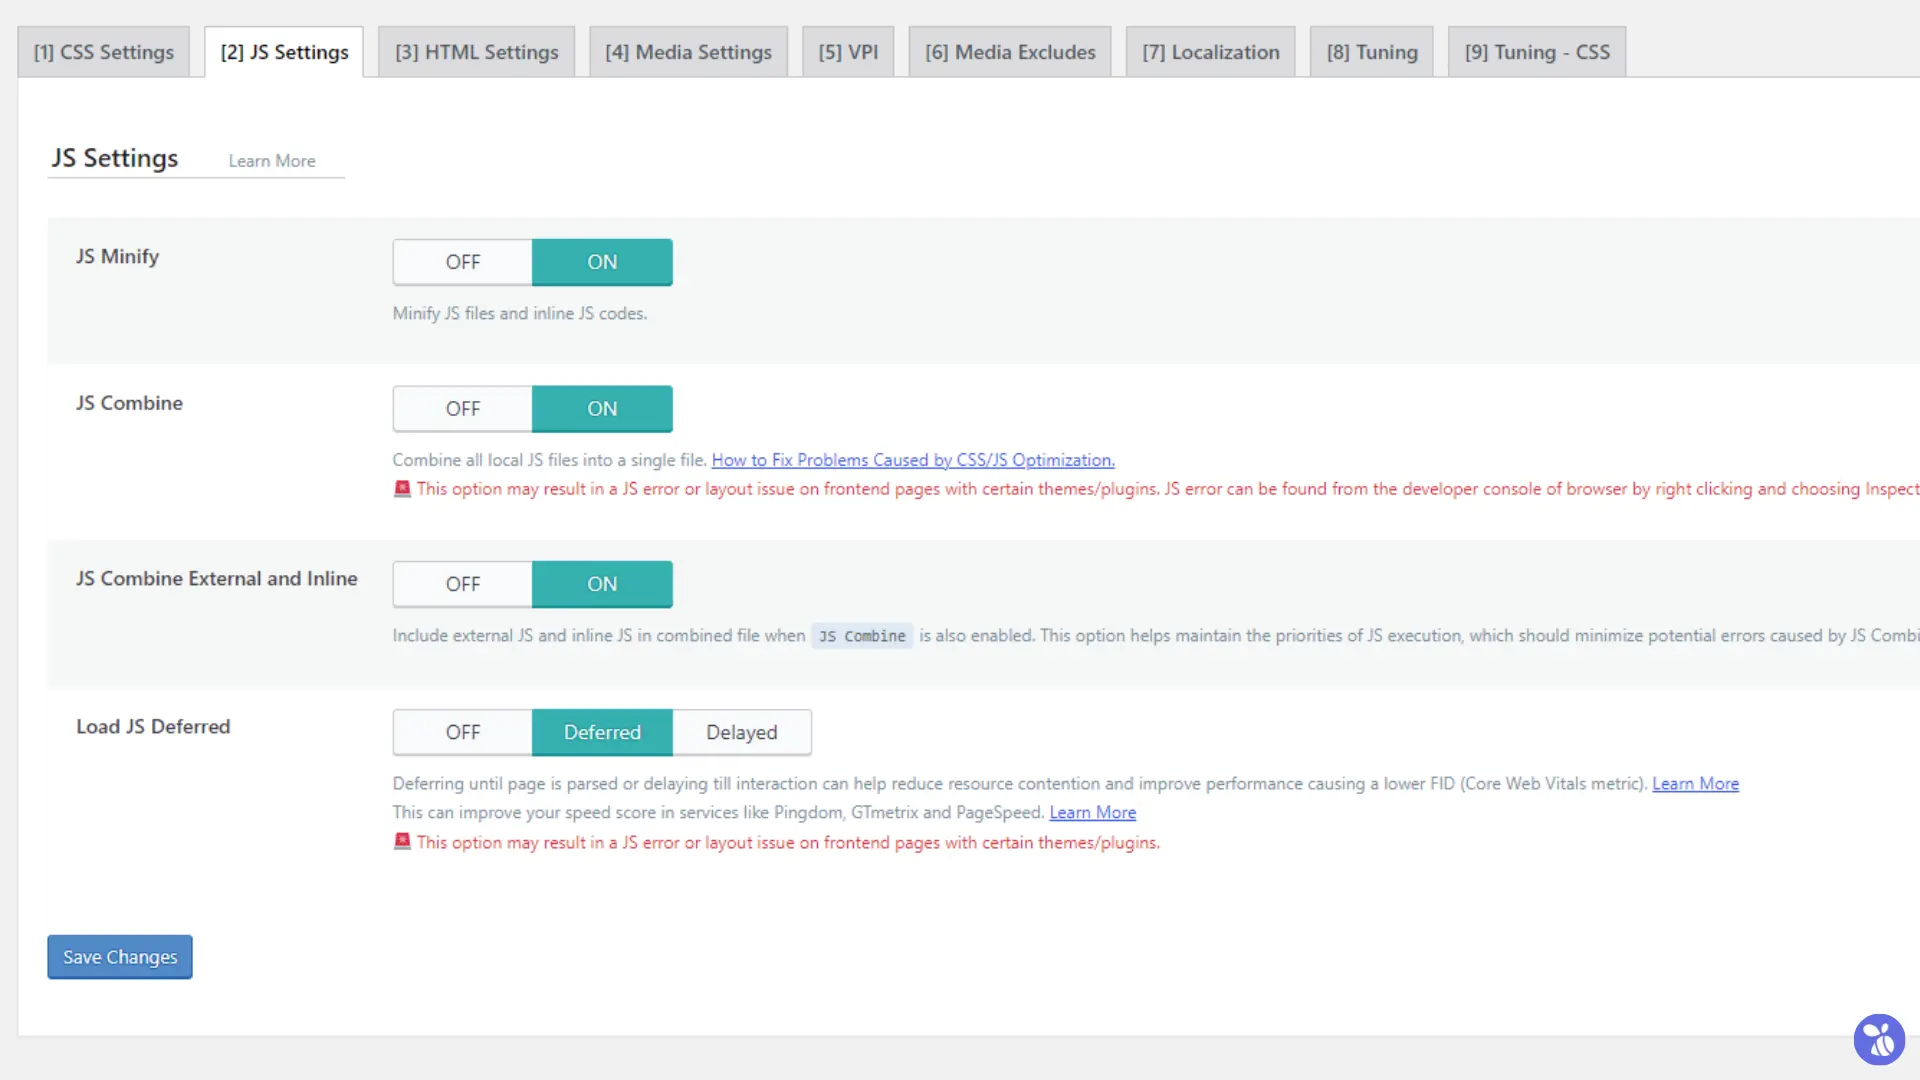
- JS Minify
Minifies JavaScript files and inline JS code to reduce file sizes and improve loading times.
Recommendation: Turn this ON to optimize JavaScript delivery.
- JS Combine
Combines all local JavaScript files into a single file, reducing the number of HTTP requests.Caution: This option may cause layout issues or JavaScript errors on pages that rely on specific theme or plugin scripts.
Recommendation: Use with caution. Turn ON only if no compatibility issues arise during testing.
- JS Combine External and Inline
Includes external JavaScript and inline JavaScript in the combined file when JS Combine is also enabled. This helps maintain the priorities of JavaScript execution and minimizes potential errors. If JS Combine is turned ON, you can also enable this option to maximize its benefits. However, test your site for any layout or functionality issues.
- Load JS Deferred
Offers three modes for handling JavaScript loading:
- OFF: No deferral applied (default).
- Deferred: Delays JavaScript execution until the page has been parsed.
- Delayed: Postpones execution until user interaction occurs (e.g. a scroll or click).
Deferring JavaScript can reduce resource contention, improve loading speeds, and positively impact your speed scores in services like Pingdom, GTmetrix, and PageSpeed Insights.
Recommendation: Set to Deferred to improve performance while maintaining functionality in most cases. Use Delayed only if your website does not rely heavily on JavaScript for initial rendering. Test thoroughly to ensure no functionality breaks on the frontend.
iii. HTML Settings
The HTML Settings allow you to optimize your site’s HTML structure and related features to improve performance. These settings can help minimize resource usage, reduce loading times, and enhance Core Web Vitals metrics.
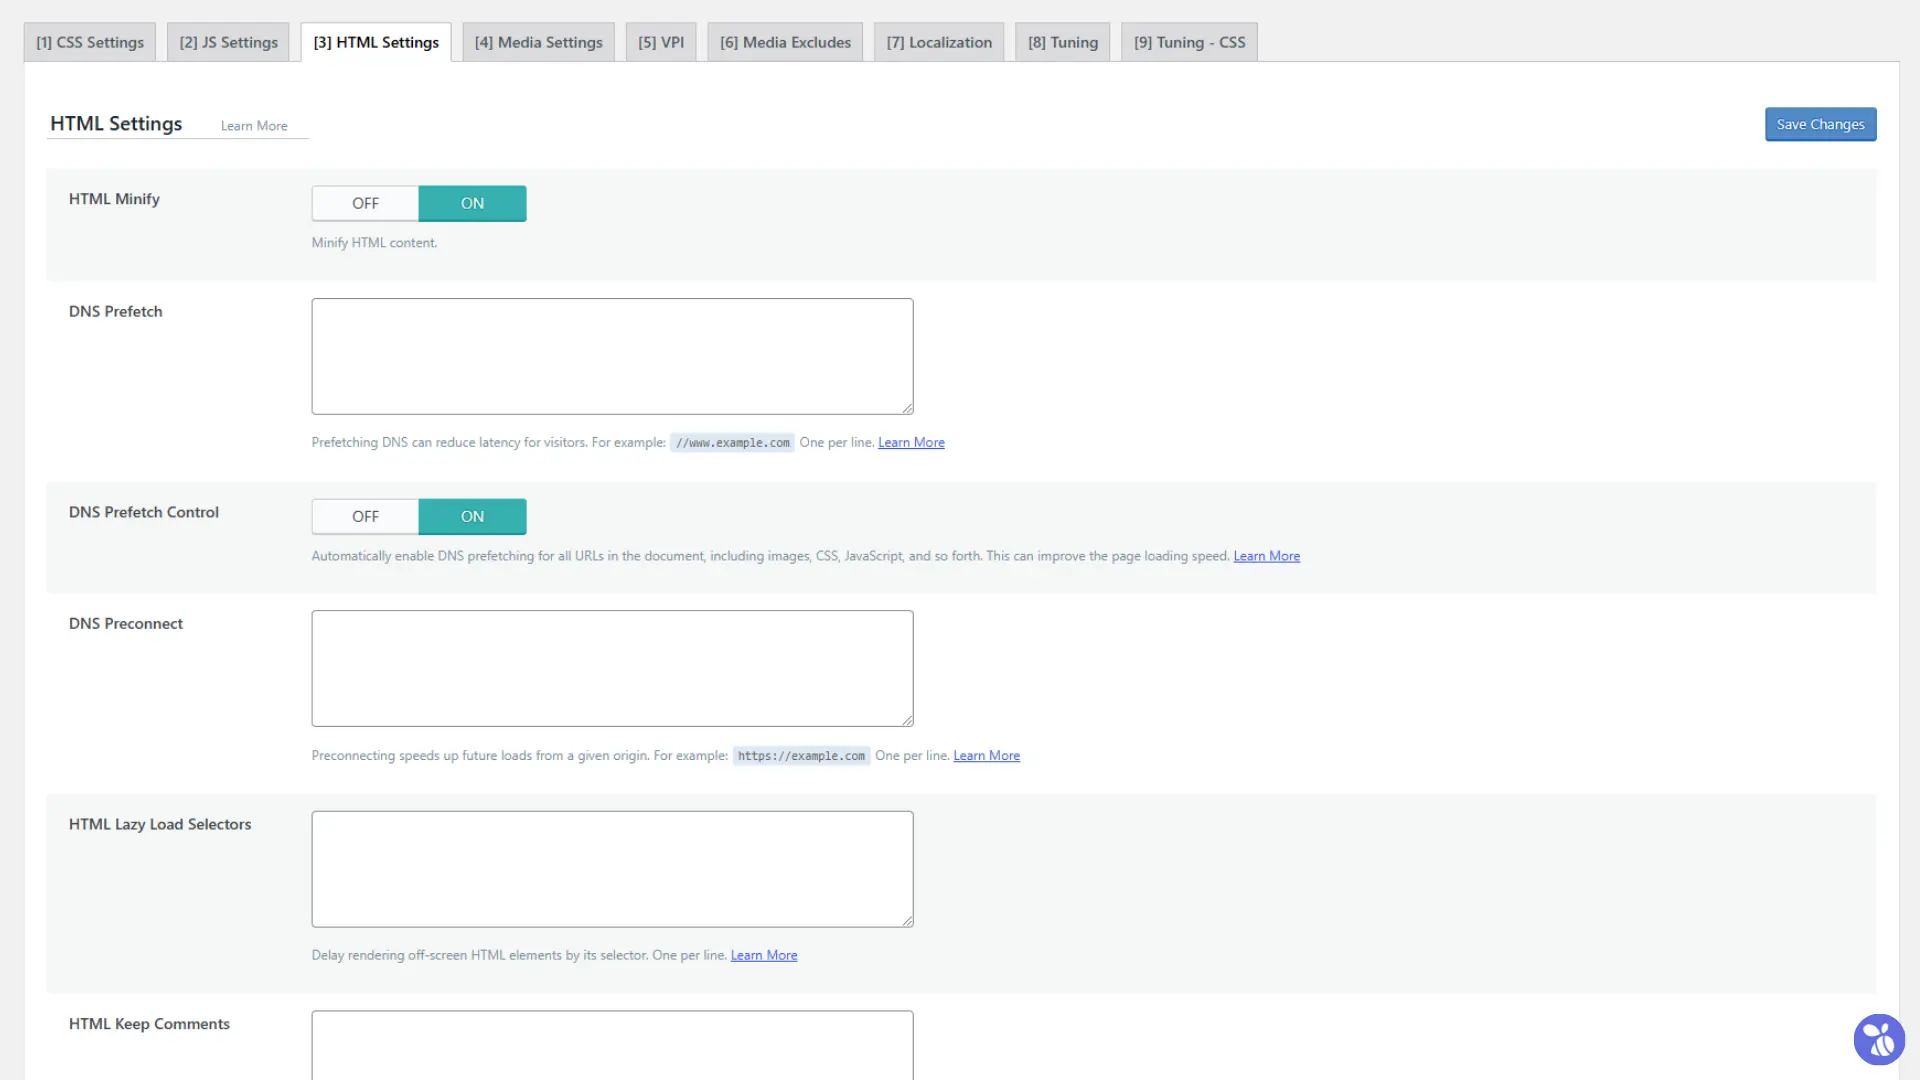
- HTML Minify
Minifies HTML content by removing unnecessary spaces, line breaks, and comments (unless specified). This reduces the overall file size, improving loading speeds.
Recommendation: Turn this ON. It is a low-risk optimization that benefits all websites.
- DNS Prefetch
Prefetches DNS for specified domains to reduce latency for visitors. This is particularly useful for external resources like CDN links. Add relevant domains manually in the text area according to your needs.
- DNS Prefetch Control
Automatically prefetches DNS for all URLs in the document, including images, CSS, and JavaScript. This helps improve page load speed by pre-resolving DNS queries.
Recommendation: Turn this ON for sites with many external resources.
- DNS Preconnect
Preconnects to specified domains to establish connections earlier, speeding up future loads. Add necessary domains manually if needed.
- HTML Lazy Load Selectors
Delays the rendering of off-screen HTML elements by their selector, which can improve performance on pages with heavy content. Use this cautiously. Add selectors manually if required.
- HTML Keep Comments
Retains HTML comments that match a specified pattern during the minification process. Useful for preserving necessary developer comments. Add patterns manually if needed.
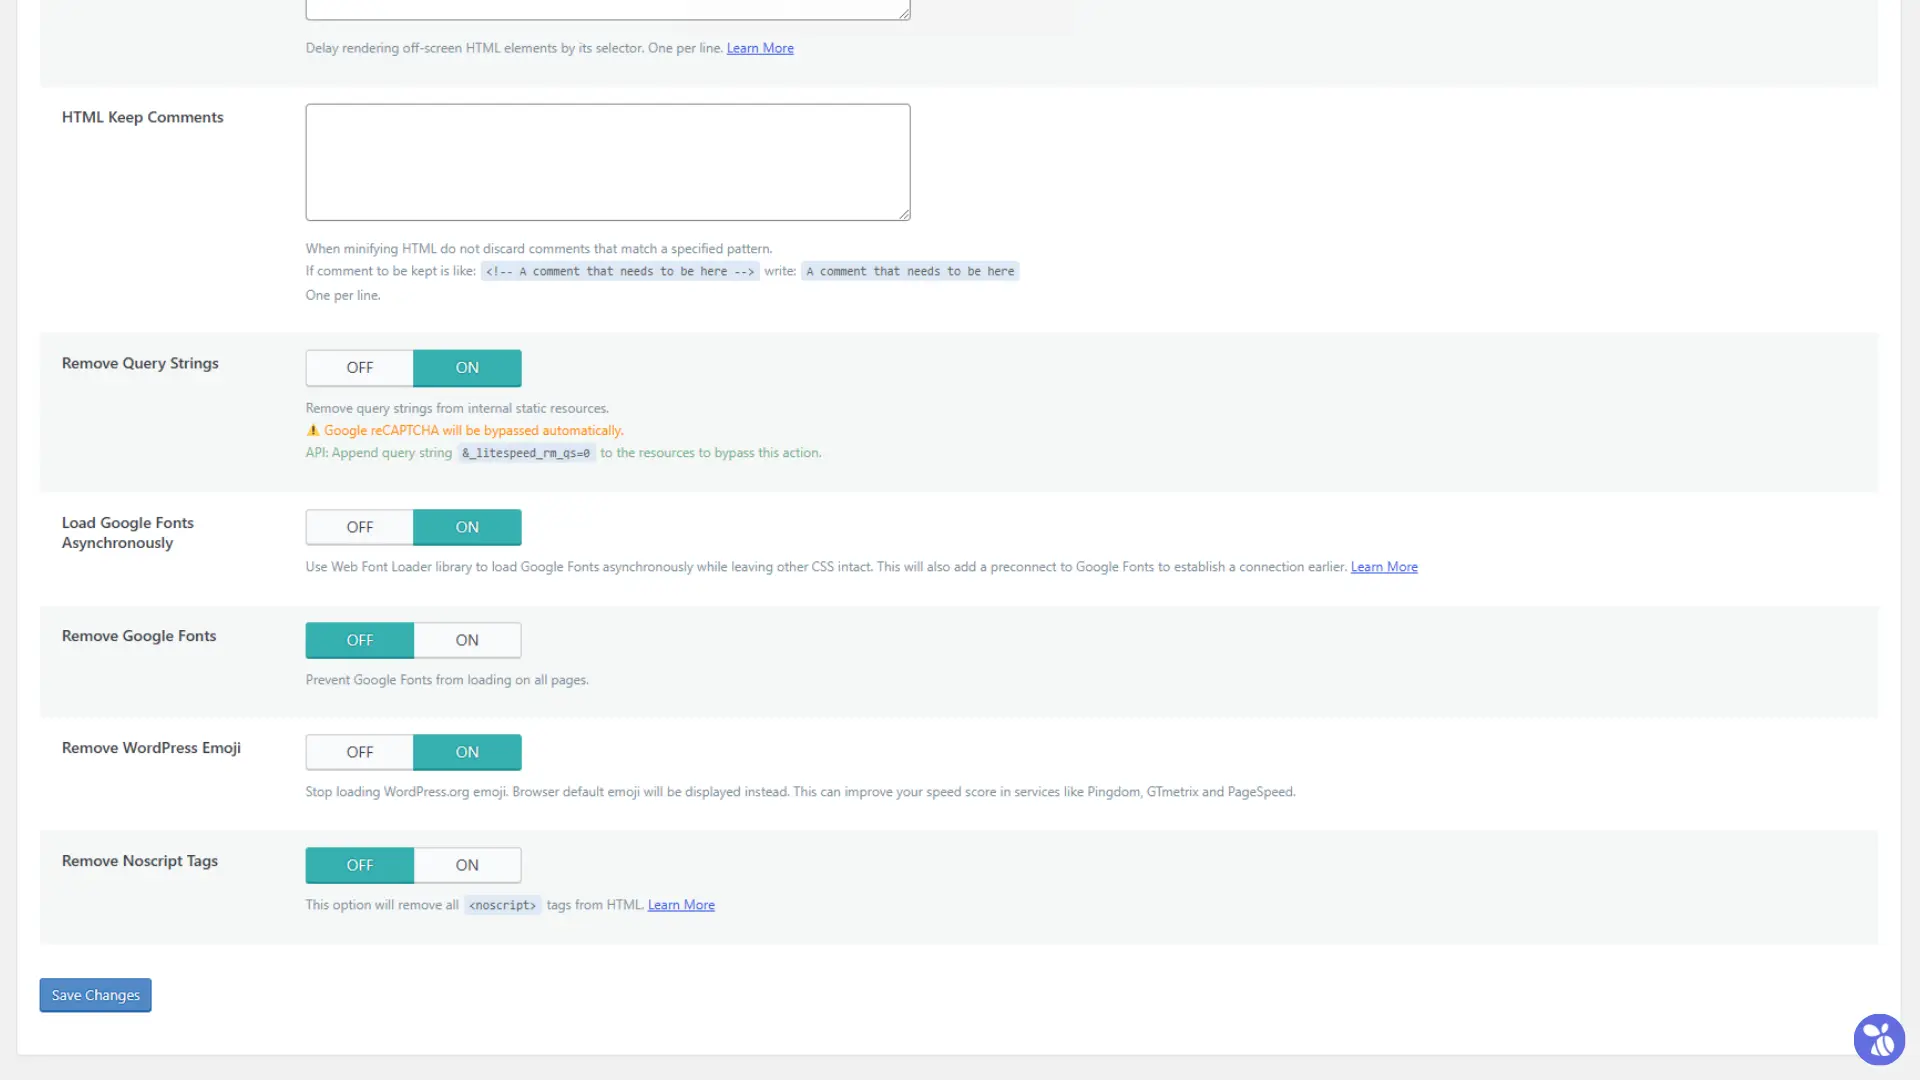
- Remove Query Strings
Removes query strings from internal static resources to make them more cacheable. This can enhance caching efficiency and speed.
Recommendation: Turn this ON, but ensure that it does not interfere with functionalities like Google reCAPTCHA or other APIs that rely on query strings.
- Load Google Fonts Asynchronously
Uses the Web Font Loader library to load Google Fonts asynchronously while adding a preconnect for faster loading. This improves rendering speeds and prevents fonts from blocking the page load.
Recommendation: Turn this ON if your site uses Google Fonts.
- Remove Google Fonts
Prevents Google Fonts from loading on your site. This is useful if your site doesn’t require custom fonts or relies on system fonts for better performance.
Recommendation: Turn this OFF unless you want to disable Google Fonts completely.
- Remove WordPress Emoji
Disables the WordPress.org emoji script, which loads by default. Browser-default emojis will be displayed instead, reducing resource usage.
Recommendation: Turn this ON. It is a low-risk optimization that can improve speed scores.
- Remove Noscript Tags
Removes all<noscript>tags from HTML. These tags are typically used for browsers without JavaScript support.
Recommendation: Turn this OFF.<noscript>tags are helpful for older browsers or users with JavaScript disabled.
iv. Media Settings
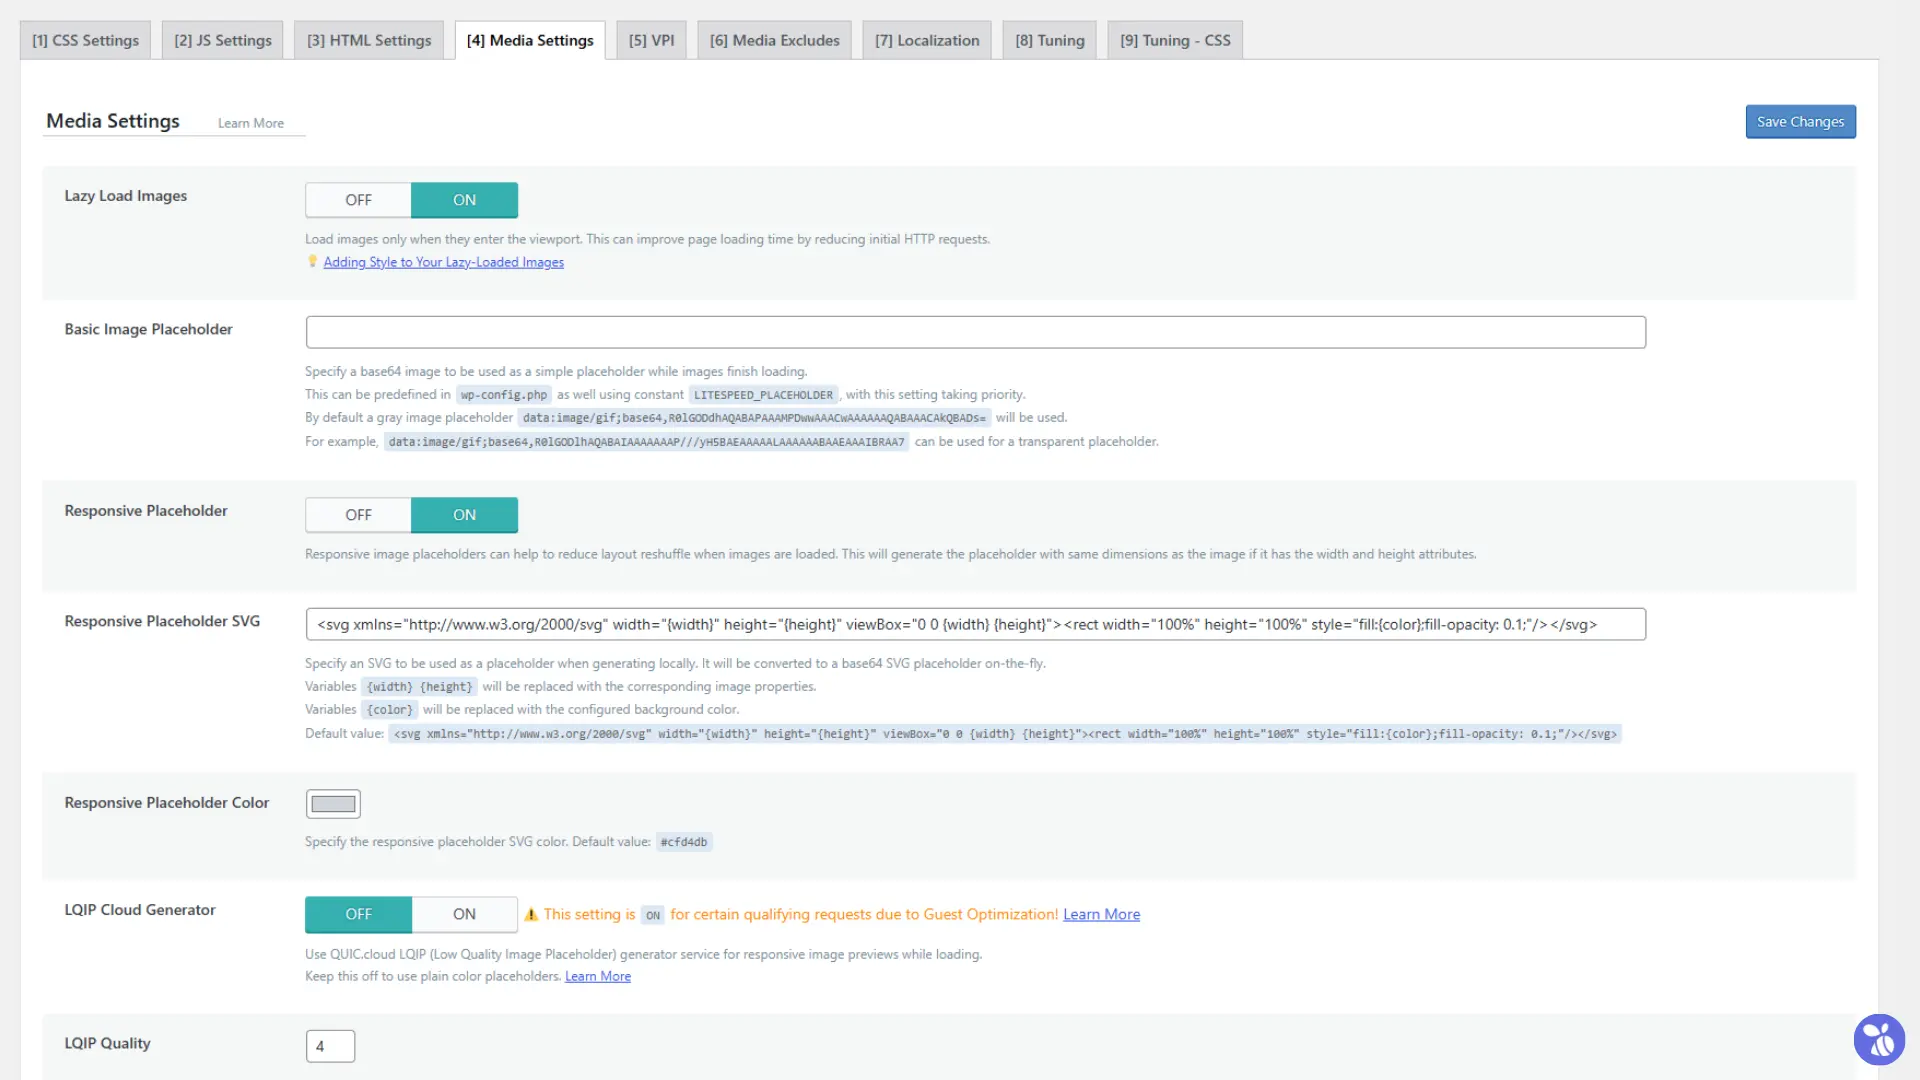
- Lazy Load Images
Loads images only when they are about to enter the viewport, reducing initial HTTP requests and improving page load speed.
Recommendation: Turn ON. Ideal for most websites as it significantly enhances performance, especially on image-heavy pages.
- Basic Image Placeholder
Specifies a base64 placeholder image to display while images load. By default, a gray image is used, but you can configure this with your own placeholder. Default settings work well for most sites.
- Responsive Placeholder
Generates responsive placeholders matching the dimensions of the images. This minimizes layout reshuffles as images load.
Recommendation: Turn ON. It reduces layout shifts and improves user experience, especially for sites with varying image sizes.
- Responsive Placeholder SVG
Uses an SVG as a placeholder, converted to base64 on-the-fly. The placeholder adapts to the dimensions and background color of the image. Default settings are sufficient for most websites.
- LQIP Cloud Generator
Uses the QUIC.cloud service to generate Low Quality Image Placeholders for responsive previews.
Recommendation: Turn OFF unless you want detailed image previews while loading. Enabling this may consume server resources and QUIC.cloud points.
- LQIP Quality
Sets the quality of LQIP. Higher values improve resolution but increase file size and resource consumption. Default is 4 (low-quality placeholders).
Leave at the default value (4) unless you need better-quality placeholders. Increasing this may negatively affect page size.
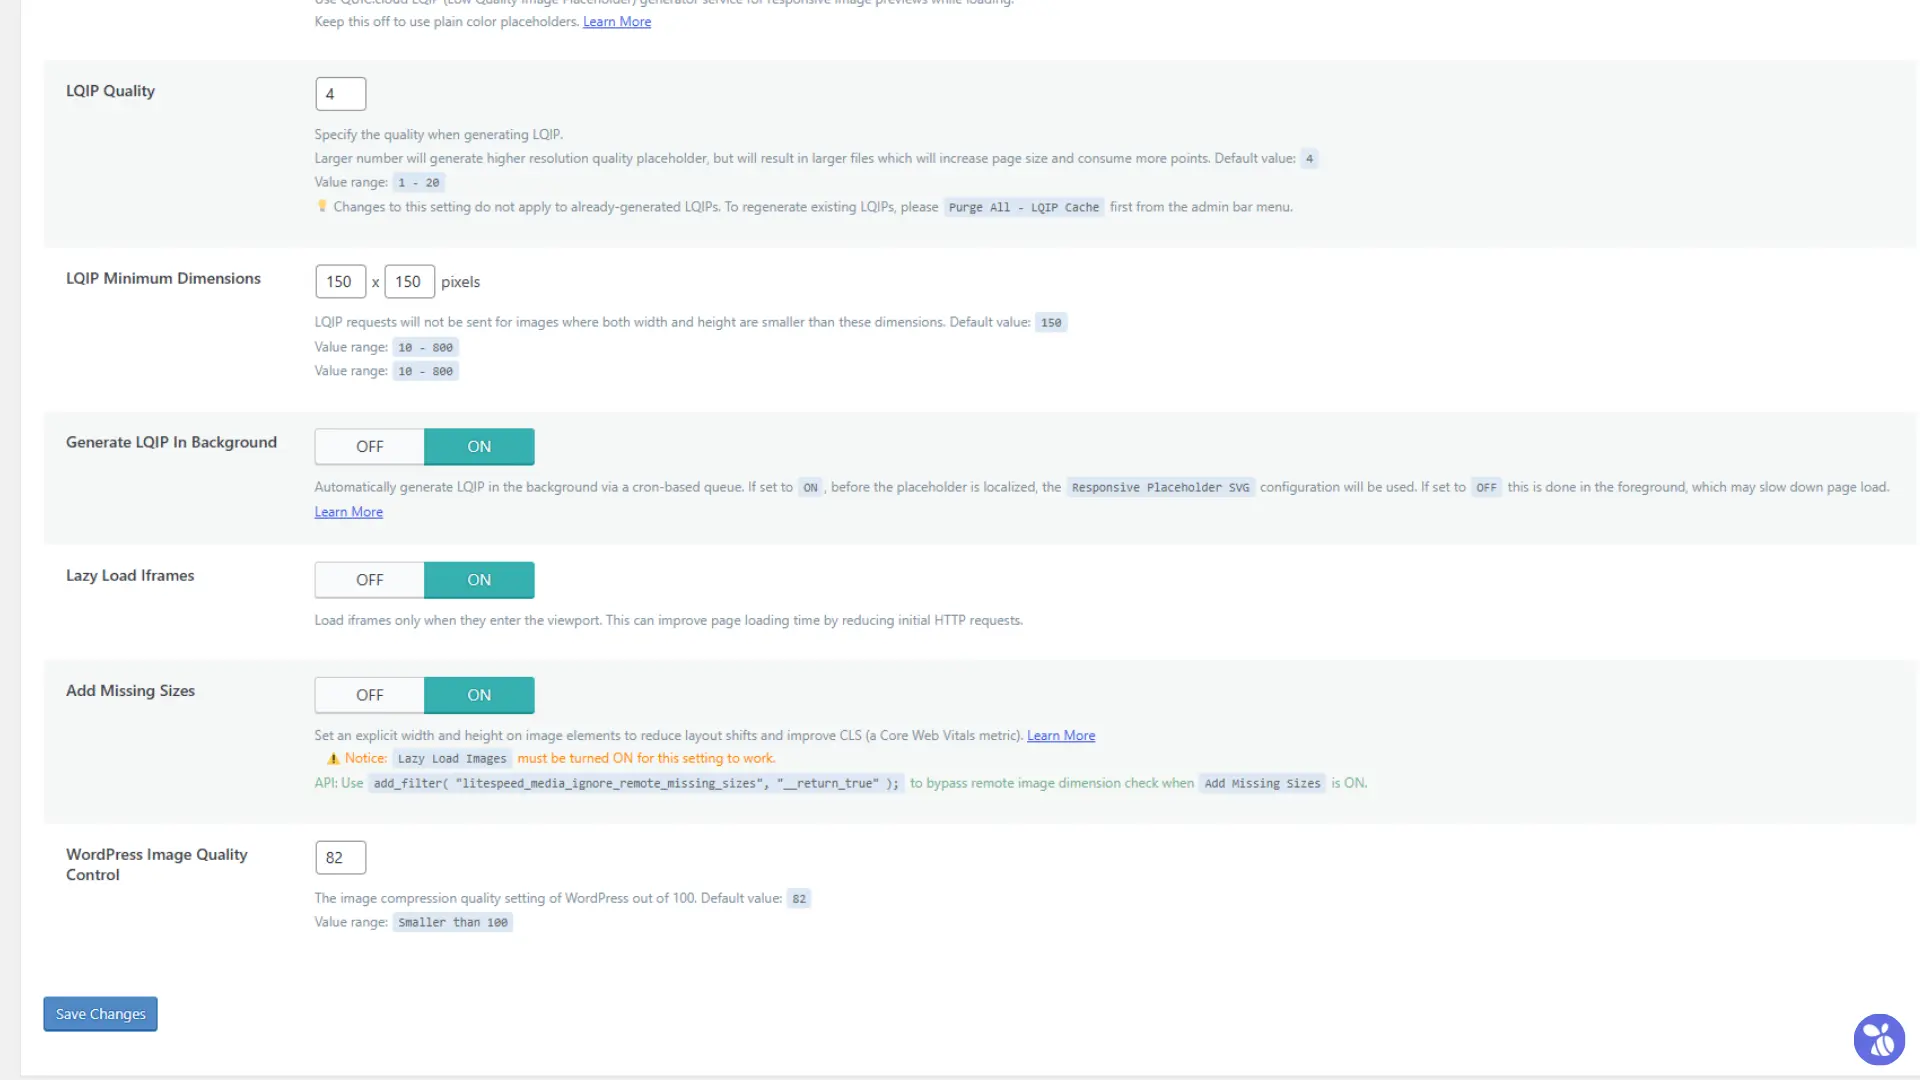
- LQIP Minimum Dimensions
Excludes small images (e.g. icons) from LQIP generation based on specified minimum dimensions. Default is 150px.Leave at the default value (150) unless you have specific requirements for smaller placeholders.
- Generate LQIP In Background
Generates LQIP via a cron job in the background. If OFF, placeholders are generated in the foreground, potentially slowing page load.
Recommendation: Turn OFF unless your site heavily relies on LQIP. Background generation can consume server resources unnecessarily for most websites.
- Lazy Load Iframes
Loads iframe content (e.g. videos) only when it enters the viewport, reducing initial HTTP requests and improving load times.
Recommendation: Turn ON. This is beneficial for sites embedding iframes, such as YouTube videos.
- Add Missing Sizes
Sets explicit width and height attributes for images to reduce layout shifts and improve the CLS (Cumulative Layout Shift) Core Web Vitals metric. Lazy Load Images must be ON for this to work.
Recommendation: Turn ON. Helps improve user experience and Core Web Vitals score.
- WordPress Image Quality Control
Configures WordPress’s default image compression quality (default: 82). Lower values reduce file size but compromise image quality. Leave at default value (82) for a balance between quality and performance. Adjust as needed for specific use cases.
v. Viewport Images
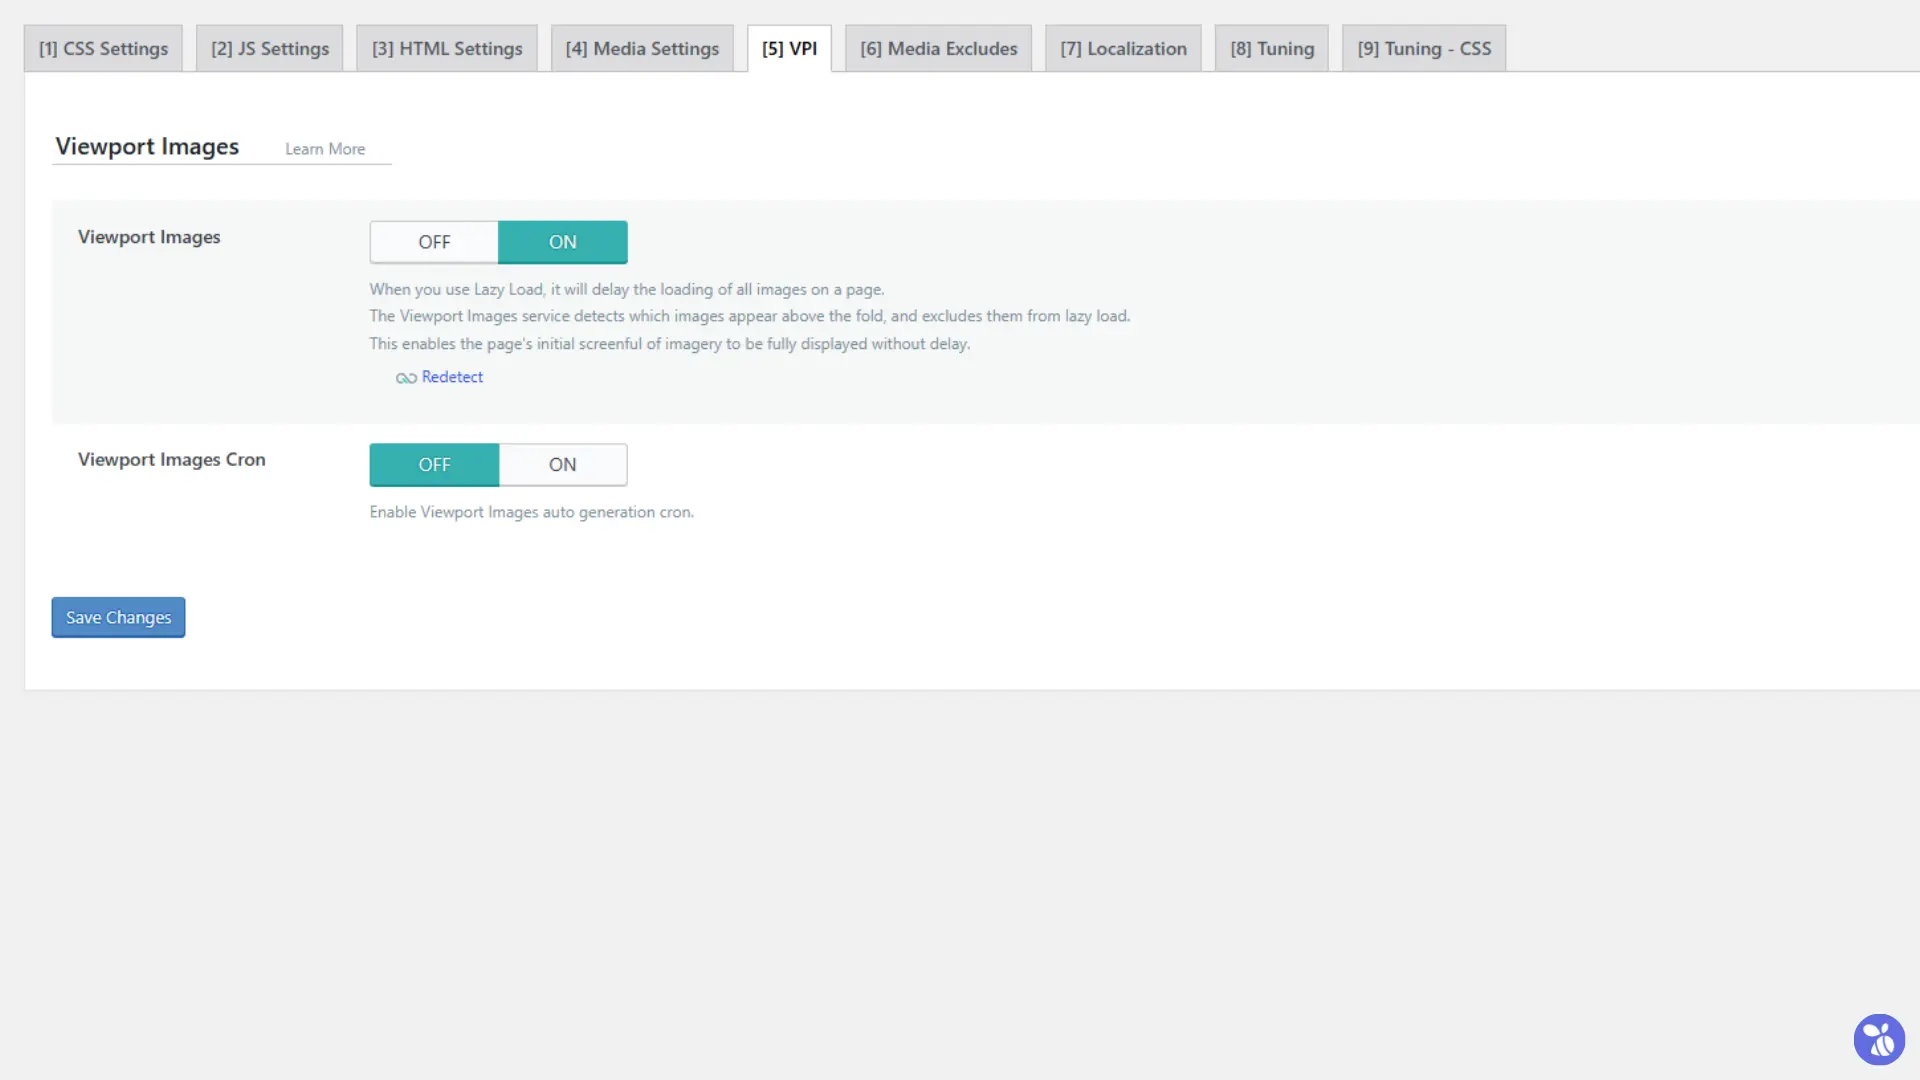
- Viewport Images
When Lazy Load is enabled, all images are delayed until they come into the viewport. The Viewport Images feature detects images that appear above the fold (visible area without scrolling) and excludes them from lazy loading. This ensures that the initial visible content is displayed without delay, improving user experience.
Recommendation: Turn ON. It enhances the perceived load speed of your website, especially for users on slower networks, by prioritizing visible content.
- Viewport Images Cron
Automatically generates and updates the Viewport Images data via a cron job. This ensures that changes to the page’s layout or content are accounted for without manual intervention.
Recommendation: Turn ON if your website content changes frequently. For static websites with rarely updated layouts, you can leave this OFF to conserve server resources.
vi. Media Excludes
The Media Excludes feature allows you to specify exceptions for certain media elements from being affected by Lazy Load, LQIP (Low Quality Image Placeholder), or other image optimization settings.
When to Use
- Use Media Excludes only if specific media elements on your website are not displaying as expected or if their loading behavior is negatively affected by optimization settings.
- For example: Exclude critical images, banners, or logos that need to load immediately without delays. Exclude specific iframe or embedded media that should not use Lazy Load for functionality or aesthetic reasons.
Best Practices
- Keep it minimal – Avoid overusing exclusions, as it can reduce the benefits of Lazy Load and optimization.
- Target precisely – Use class names or URIs to pinpoint the exact media elements to exclude rather than broad criteria.
- Test thoroughly – After applying exclusions, review your website’s functionality and appearance to ensure the issue is resolved and performance remains optimized.
Recommendation
Leave these fields blank unless exclusions are necessary for resolving specific issues. This ensures that your website benefits from the full extent of media optimization.
vii. Localization Settings
The Localization Settings in LiteSpeed Cache help optimize external resources by storing them locally, reducing dependency on third-party servers, and potentially improving website performance. These settings are especially useful for caching Gravatar images and external resources to enhance load speed and reduce latency.
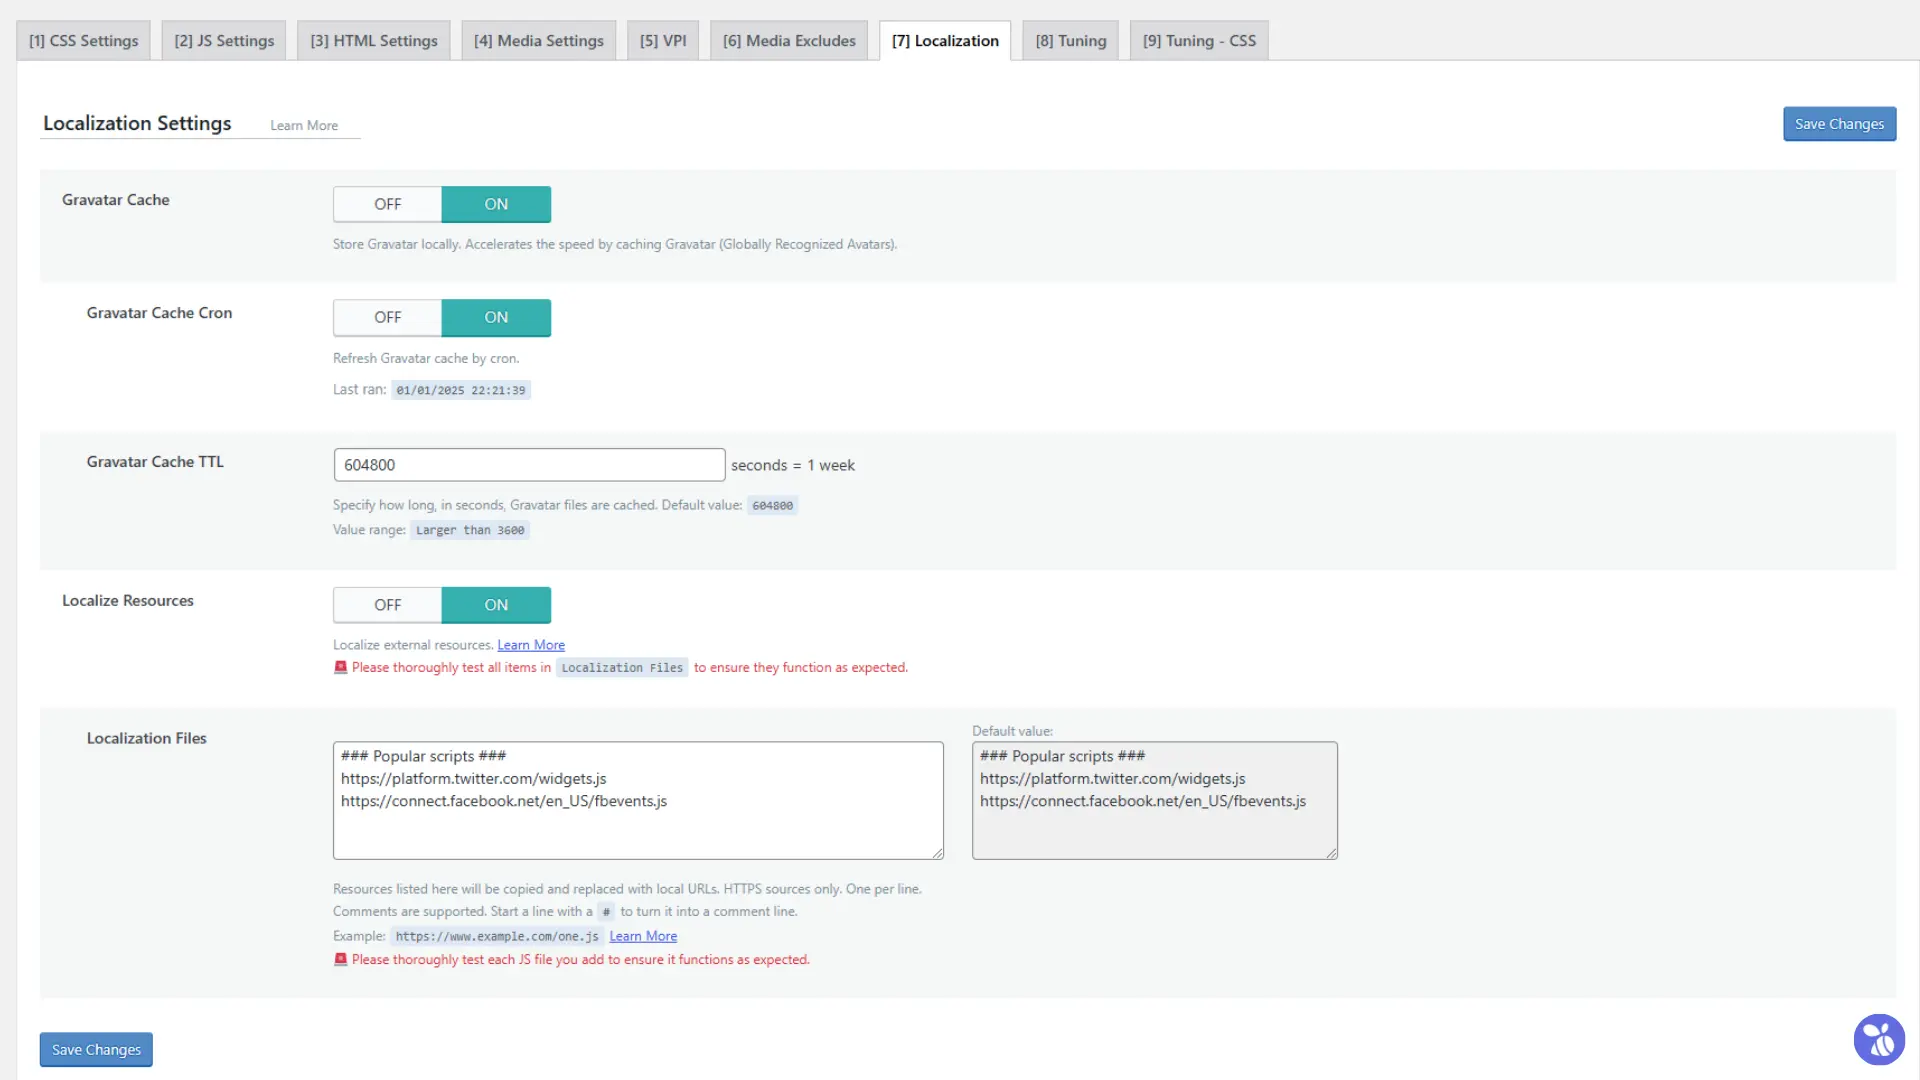
- Gravatar Cache
Stores Gravatar images locally on your server, reducing the time needed to fetch these images repeatedly from external servers.
Recommendation: Turn ON if your website uses Gravatar profiles, especially for comments or user profiles, to speed up load times.
- Gravatar Cache Cron
Automatically refreshes the Gravatar cache at regular intervals using a cron job.
Recommendation: Turn ON to ensure the cached Gravatar images are updated periodically, preventing outdated profiles from being displayed.
- Gravatar Cache TTL
Specifies how long (in seconds) Gravatar files should be cached. The default value is 604800 seconds (1 week). Use the default value unless you require shorter or longer caching durations. Ensure the value is greater than 3600 seconds (1 hour).
- Localize Resources
Copies external resources (e.g. JavaScript, CSS files) and stores them locally, allowing the site to serve these files directly.
Recommendation: Turn ON to improve performance by reducing the dependency on third-party servers.
- Localization Files
Allows you to specify external HTTPS resources to be localized. These files are copied to your server and served locally. Comments can be added by starting a line with #.
Recommendation: Leave default settings unless you have specific external resources that need localization.
By using these settings wisely, you can achieve faster load times and a smoother user experience without overburdening your server.
viii. Tuning Settings
The Tuning Settings in LiteSpeed Cache provide advanced control over JavaScript (JS) optimization. These settings are primarily used to exclude specific JS files or elements from being combined, deferred, or delayed. Such exclusions can be critical when certain scripts are essential for website functionality or when a conflict arises due to JS optimization.
When to Use
These options should only be utilized if:
- Functionality Issues – You notice layout problems, broken features, or errors on your website after enabling JS optimization (e.g. JS Combine, Load JS Deferred).
- Specific Needs – You have a script that must load immediately or should not be affected by other optimizations (e.g. analytics tracking, third-party widgets).
Best Practices
- Debug First – If your site behaves unexpectedly after enabling JS optimizations, identify the conflicting script(s) using browser developer tools or error logs.
- Exclude Wisely – Add only the necessary scripts to the relevant fields to minimize exclusions while maintaining performance.
- Test Changes – After making adjustments, thoroughly test your website on desktop and mobile to ensure functionality and performance remain intact.
Default Approach
If your website runs with default JS optimization settings without any issues, no action is required in this section. These fields are primarily for troubleshooting and customization, making them unnecessary for most users.
By using the Tuning Settings only when needed, you can maintain a balance between optimal performance and flawless functionality.
ix. Tuning Settings – CSS
The Tuning Settings for CSS in LiteSpeed Cache offer advanced control over CSS optimization. These settings allow you to exclude specific CSS files, selectors, or URIs from optimizations like Combine CSS, Generate UCSS (Unused CSS), or Critical CSS (CCSS). They are designed to handle situations where CSS optimization causes styling issues on your website.
When to Use
You should configure these options only if:
- Styling Problems – Some elements on your site appear broken, misaligned, or missing after enabling CSS Combine, Generate UCSS, or Critical CSS.
- Specific Needs – Certain styles must remain untouched to ensure proper rendering or functionality.
Best Practices
- Diagnose First – If you notice styling inconsistencies, determine which CSS files or selectors are affected.
- Add Only Essential Exclusions – Excluding unnecessary CSS can reduce optimization benefits. Use the minimum number of exclusions required for your site to function correctly.
- Test Thoroughly – After applying changes, review your site’s appearance and functionality on both desktop and mobile.
Default Approach
If your website displays correctly without any CSS-related issues, you do not need to configure these settings. These fields are for troubleshooting and fine-tuning and are not necessary for most users with standard setups.
By using the CSS Tuning Settings judiciously, you can resolve conflicts while maintaining optimal performance and clean styling.
4. LiteSpeed Cache Database Optimization
i. Database Optimizer
The Database Optimizer in LiteSpeed Cache offers tools to clean and optimize your WordPress database with a simple click. These actions help remove unnecessary data, reduce database size, and enhance performance.
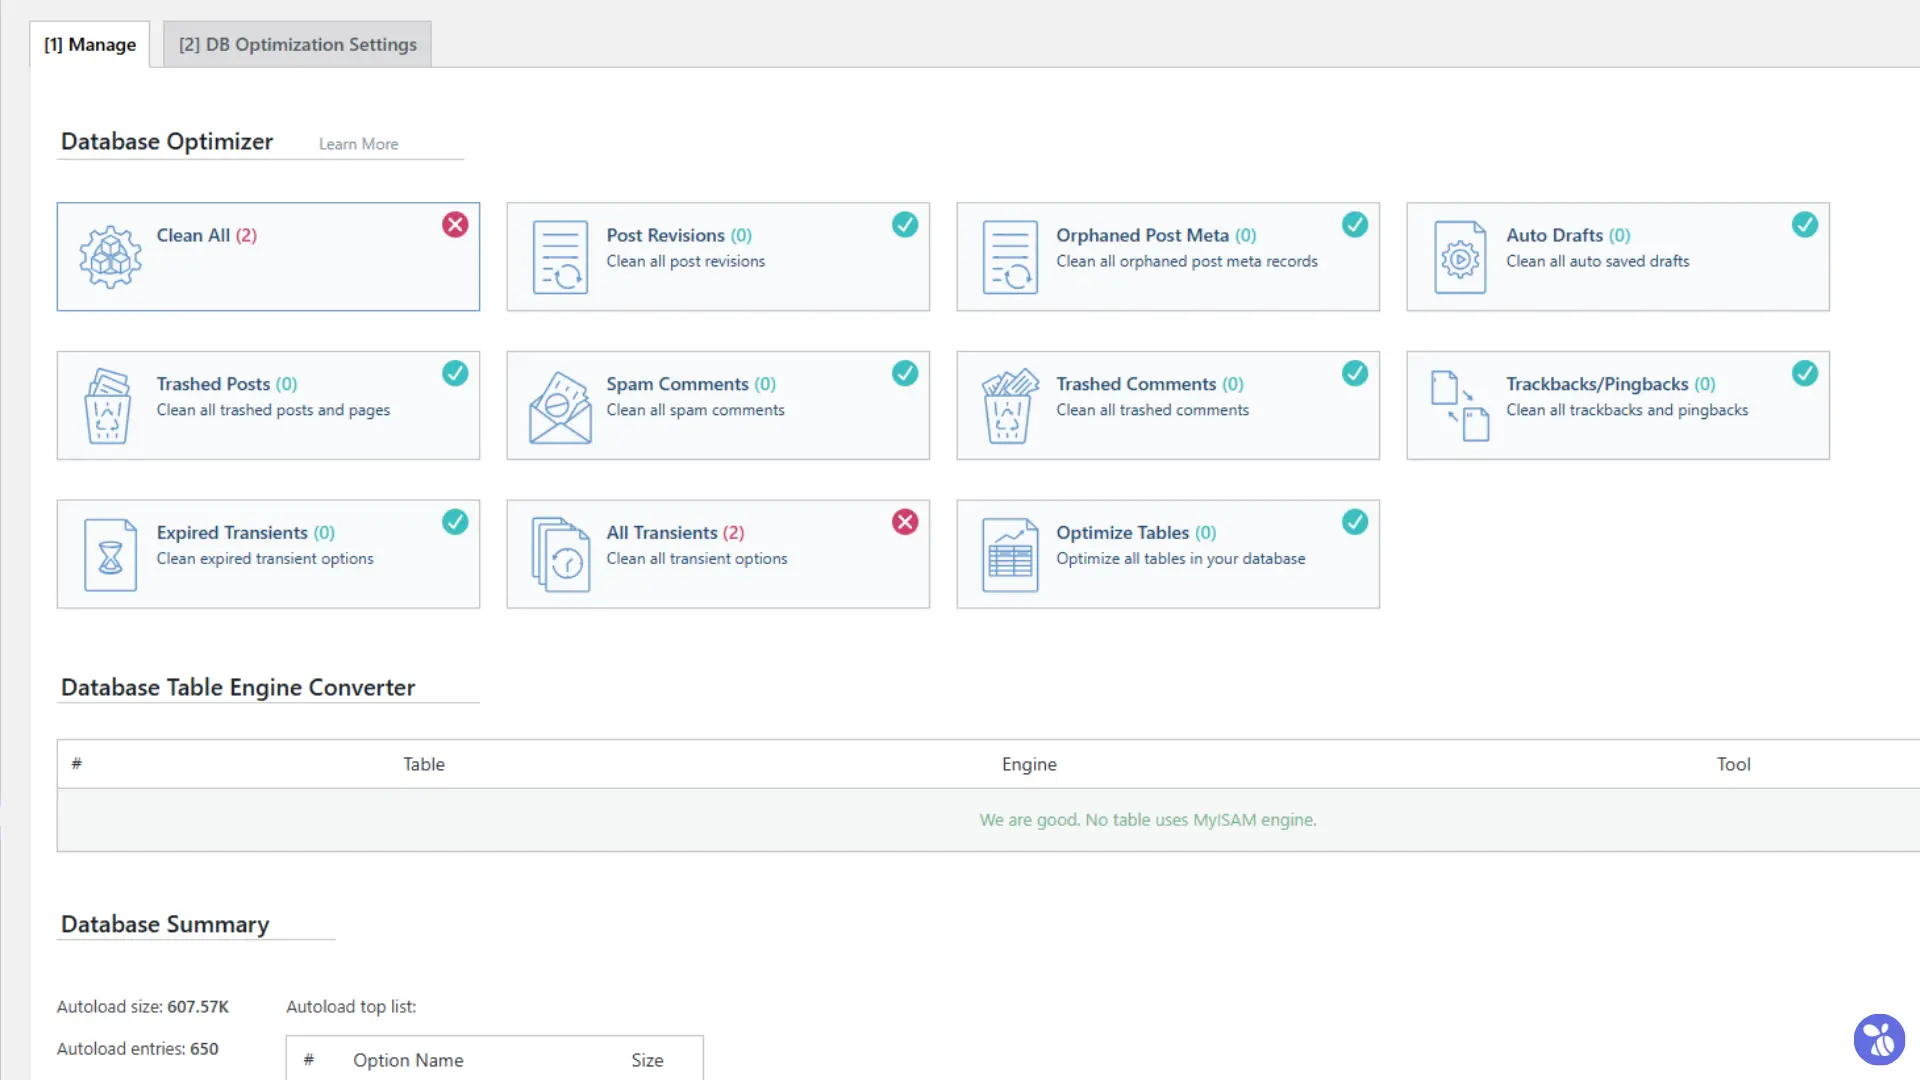
- Clean All – Executes all the individual database cleanup actions (listed below) in a single click. This is a comprehensive cleanup option ideal for routine maintenance to keep the database lean and efficient.
- Post Revisions – Deletes older versions of posts and pages saved automatically by WordPress during editing. This reduces database size and is especially useful for sites with frequent updates.
Note: The number of revisions retained is controlled by the Revisions Max Number and Revisions Max Age settings in the DB Optimization Settings.
- Orphaned Post Meta – Removes metadata no longer associated with any existing posts or pages, freeing up space often left unused when posts are deleted.
- Auto Drafts – Deletes auto-saved drafts created while editing posts or pages, which are often unnecessary and can clutter the database.
- Trashed Posts – Permanently deletes posts or pages moved to the trash, preventing them from occupying storage unnecessarily.
- Spammed Comments – Deletes all comments flagged as spam by WordPress or plugins, which helps reduce database clutter and improve storage efficiency.
- Trashed Comments – Permanently removes comments moved to the trash but not yet deleted, ensuring no unnecessary storage usage.
- Trackbacks/Pingbacks – Deletes notifications from other websites linking to your content, which are often unnecessary and can bloat the database.
- Expired Transients – Removes temporary cached data (transients) that have expired, preventing the buildup of outdated or invalid information.
- All Transients – Deletes all transient data, whether expired or active, offering a more aggressive cleanup approach that should be used cautiously.
- Optimize Tables – Reorganizes and optimizes database tables to reclaim unused space and ensure efficient storage, helping maintain database performance.
The Database Optimizer is straightforward, just click on the desired action, and the tool does the rest. Regular use ensures your database remains clean and efficient, improving overall website performance.
ii. DB Optimization Settings
The DB Optimization Settings in LiteSpeed Cache provide additional controls for managing post revisions during database cleaning. These settings allow you to customize how many revisions are retained and for how long, offering a balance between maintaining revision history and optimizing database performance.
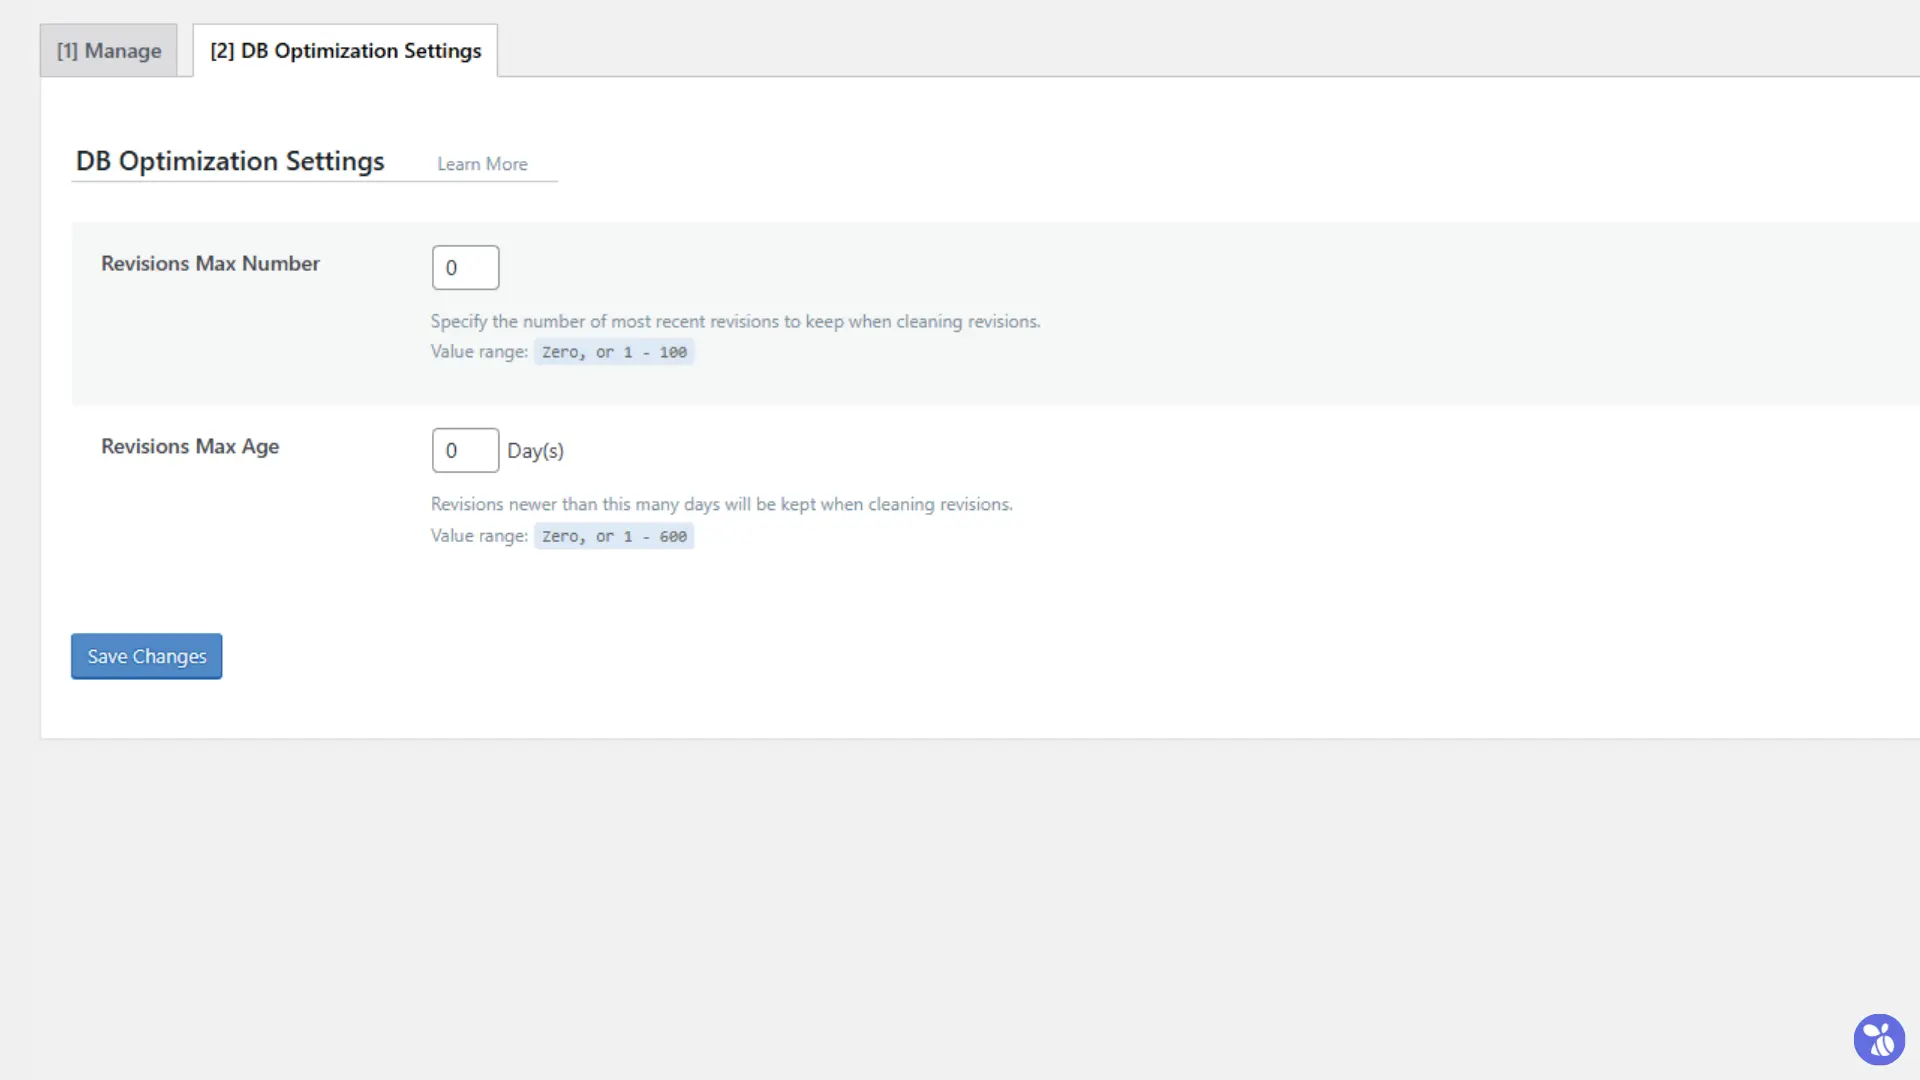
- Revisions Max Number
Defines the number of the most recent post/page revisions to keep when cleaning revisions. Older revisions beyond this limit will be deleted.
| Value Range | Description |
|---|---|
| 0 | Deletes all revisions during cleanup. |
| 1 to 100 | Retains the specified number of recent revisions for each post/page. |
| Recommendation | Set to 0 if you don’t need post revisions. Use a value between 3-5 if you want to retain a small history for safety or recovery purposes. |
- Revisions Max Age
Specifies the maximum age of revisions (in days) to keep. Revisions older than this limit will be deleted during cleanup.
| Value Range | Description |
|---|---|
| 0 | Deletes all revisions regardless of age. |
| 1 to 600 | Retains revisions that are newer than the specified number of days. |
| Recommendation | Set to 0 for aggressive cleaning, removing all revisions regardless of their age. Use a value between 30-90 days to keep recent revisions while optimizing the database. |
5. Image Optimization
The Image Optimization feature in LiteSpeed Cache is designed to reduce the size of your images without compromising their quality. Optimized images load faster, improving page speed and enhancing user experience while reducing bandwidth usage. This feature utilizes the QUIC.cloud service to process image optimization tasks efficiently.
i. Preparing LiteSpeed Cache for Image Optimization
Before using the Image Optimization feature, make sure that your website is connected to QUIC.cloud. You can do this by going to the LiteSpeed Cache plugin settings and navigating to the “General” tab. If you haven’t linked your site to QUIC.cloud, follow the on-screen instructions to register and link your domain.
How Image Optimization Works
The Image Optimization feature includes several key tasks:
- Image Compression – Reduces the file size of images by removing unnecessary metadata and using efficient compression algorithms without noticeable loss in quality.
- WebP Conversion – Converts images to the WebP format, a modern image format that provides superior compression compared to traditional formats like JPEG and PNG.
- Image Resizing – Ensures images are resized to match the dimensions required by your site, reducing unnecessary large image files.
This feature is essential for improving loading times and achieving a better performance score on tools like Google PageSpeed Insights, Pingdom, and GTmetrix.
ii. Image Optimization Settings
The Image Optimization Settings in LiteSpeed Cache offer fine-tuned control over how images are optimized, stored, and replaced for enhanced website performance.
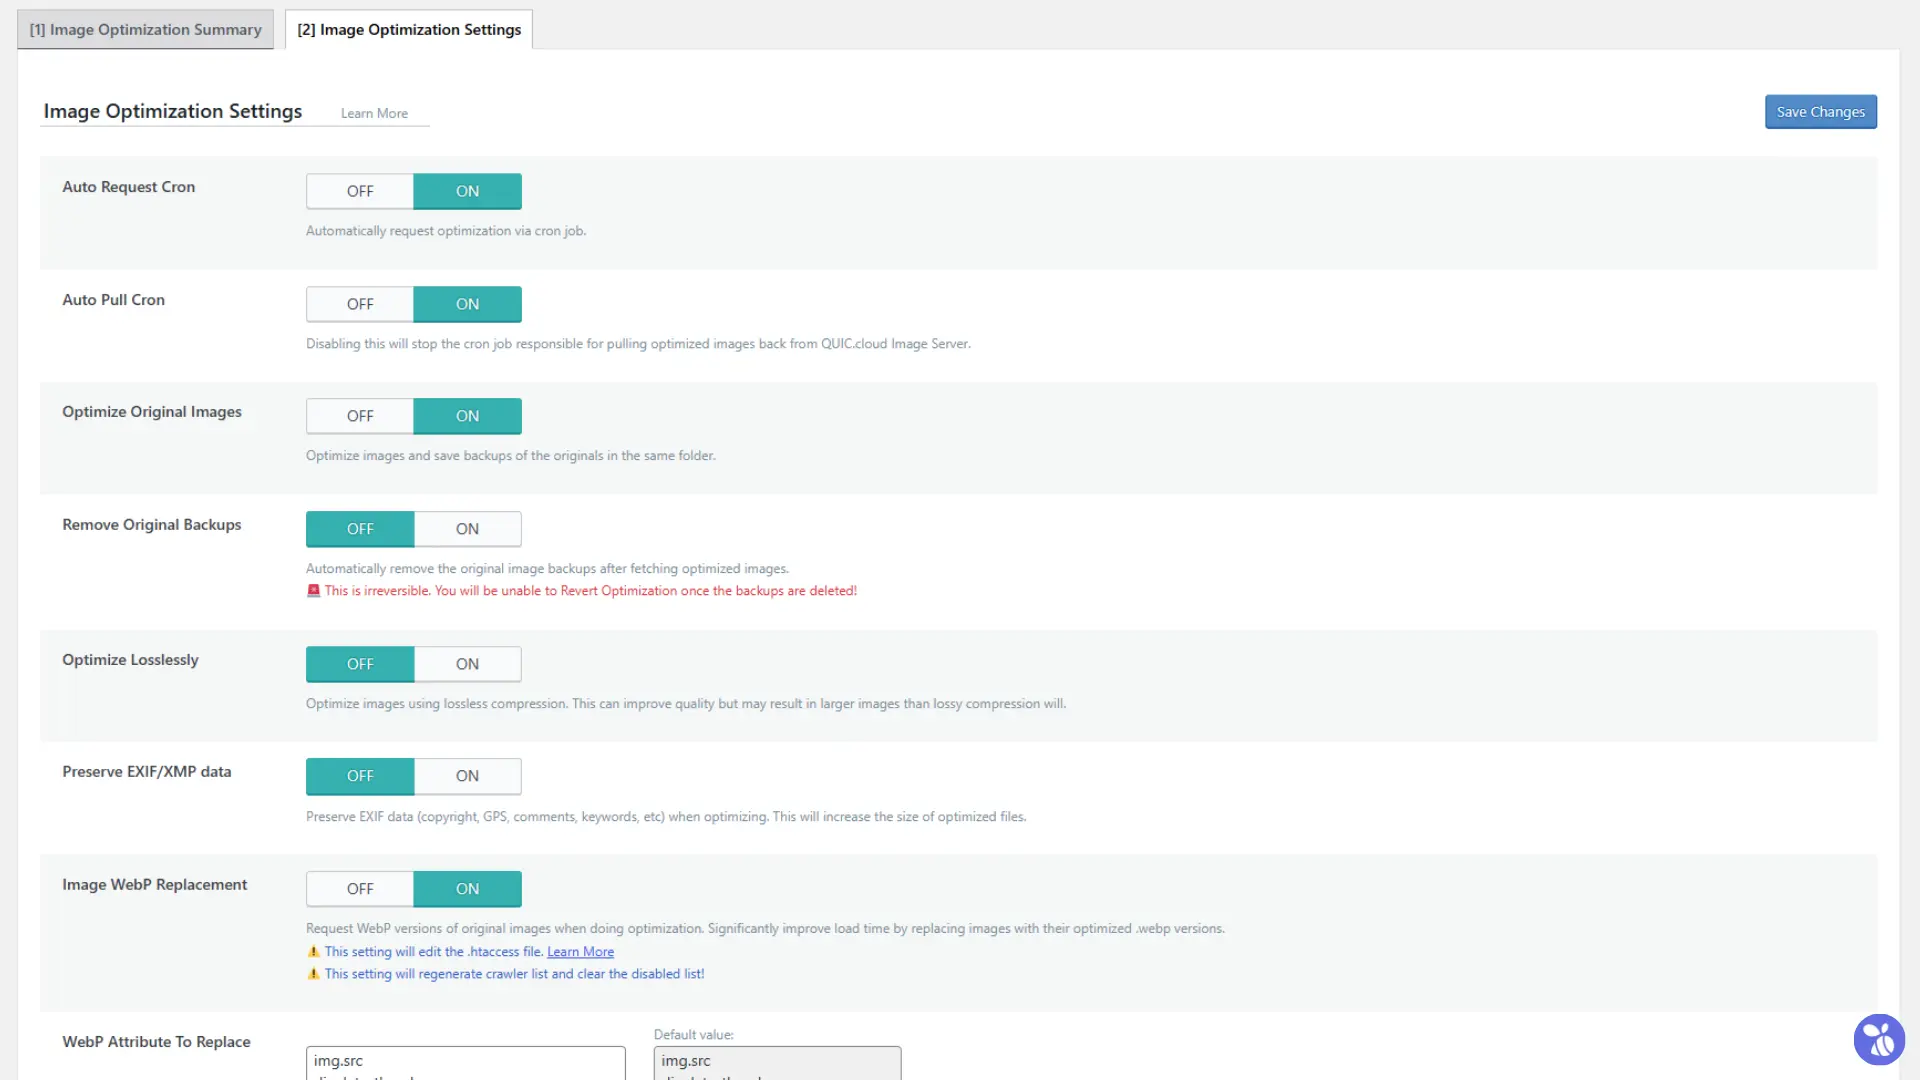
- Auto Request Cron
Automatically requests image optimization via a cron job. This ensures newly uploaded images are added to the optimization queue without manual intervention.
Recommended Setting: ON – For seamless and automated optimization.
- Auto Pull Cron
Automatically pulls optimized images back from the QUIC.cloud Image Server. Disabling this requires you to fetch optimized images manually.
Recommended Setting: ON – To streamline the optimization process and save time.
- Optimize Original Images
Optimizes the original images and saves a backup in the same folder. This allows you to revert changes if needed.
Recommended Setting: ON – To optimize all images while maintaining backups.
- Remove Original Backups
Deletes original image backups after fetching the optimized versions. This is irreversible and prevents reverting to the original images.
Recommended Setting: OFF – To ensure backups are available for future use.
- Optimize Losslessly
Uses lossless compression to optimize images, retaining 100% of the original quality. However, this may result in slightly larger file sizes compared to lossy compression.
Recommended Setting: OFF – Lossy compression provides better optimization for web performance unless quality is a priority.
- Preserve EXIF/XMP Data
Retains metadata like copyright, GPS coordinates, and comments in optimized images. This increases file size.
Recommended Setting: OFF – For faster loading times unless metadata is crucial for your site’s functionality.
- Image WebP Replacement
Requests WebP versions of the original images. The WebP format significantly reduces image sizes while maintaining quality, improving load times.
Recommended Setting: ON – To use the WebP format for better performance.
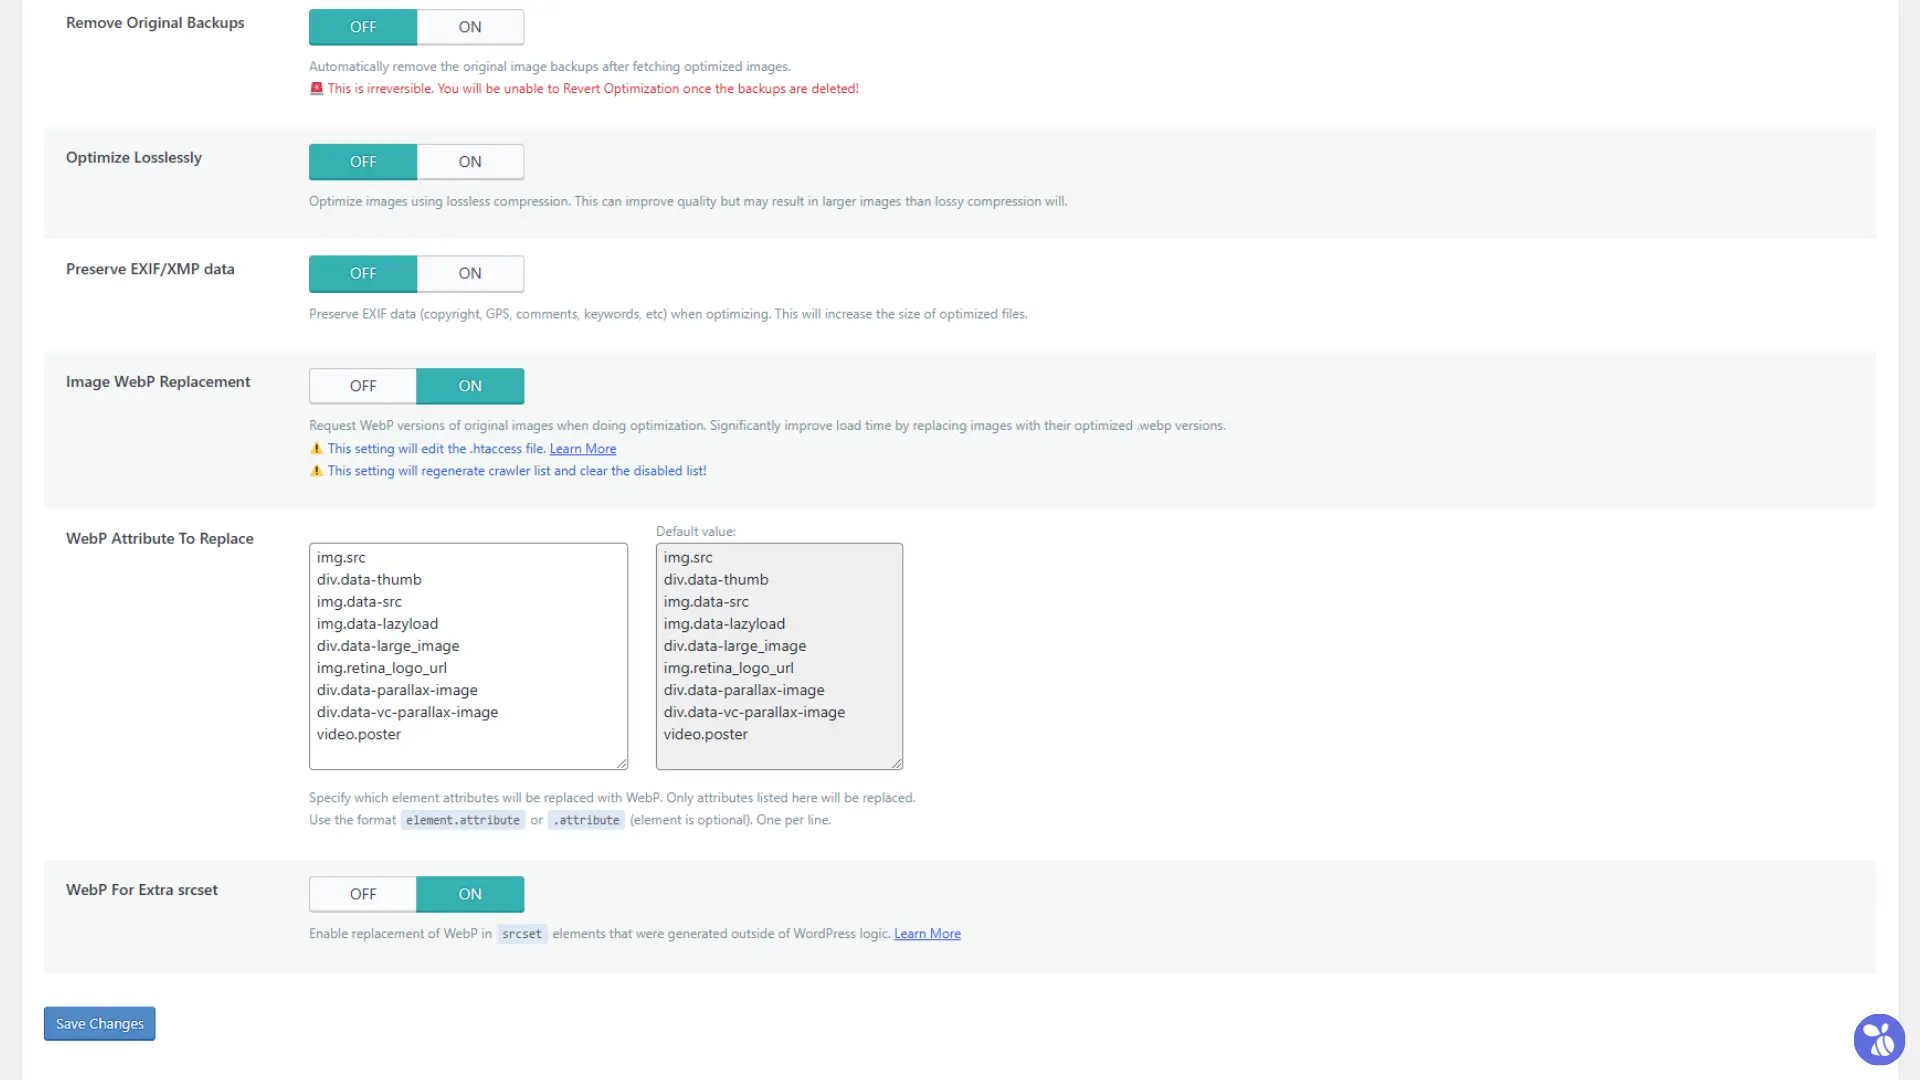
- WebP Attribute To Replace
Specifies which element attributes (like <img.src>) should be replaced with WebP versions. Default settings are sufficient for most websites.
Recommended Setting: Use Default Settings – These are optimized for common scenarios.
- WebP For Extra srcset
Enables WebP replacement in srcset attributes generated outside of WordPress logic, ensuring consistent image optimization.
Recommended Setting: ON – To ensure all images in responsive designs use optimized WebP versions.
These settings, when configured appropriately, ensure your website benefits from optimal image performance without compromising quality or functionality.
6. Toolbox >> Heartbeat Control
The Heartbeat Control settings in LiteSpeed Cache allow you to manage WordPress’s interval heartbeat functionality. The WordPress Heartbeat API is responsible for sending periodic AJAX requests, often used for auto-saving drafts or other background tasks. However, frequent heartbeats can increase server load.
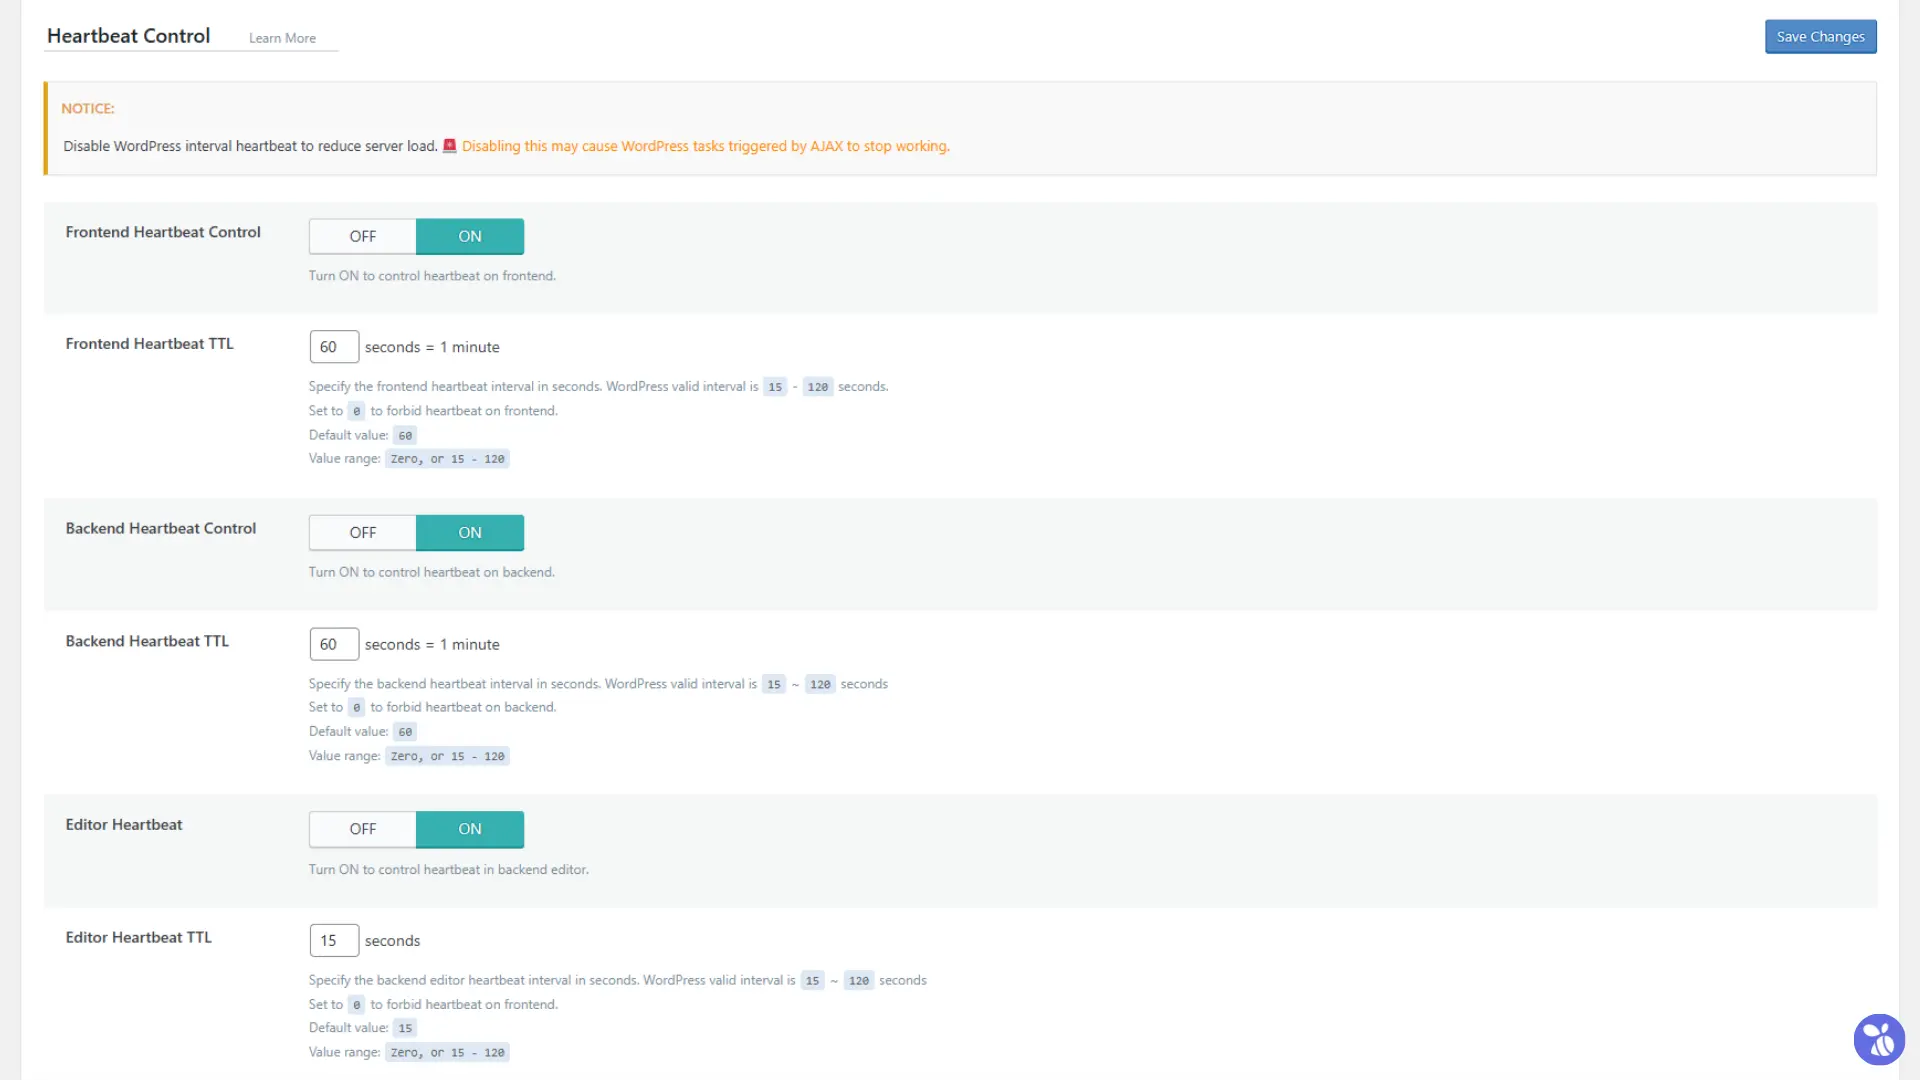
- Frontend Heartbeat Control
Enables control of the heartbeat API on the frontend. This can reduce server load caused by AJAX calls initiated by plugins or themes.
Recommended Setting: ON – To minimize unnecessary resource usage on the frontend.
- Frontend Heartbeat TTL
Defines the interval (in seconds) for the frontend heartbeat. Setting it to 0 disables the frontend heartbeat entirely.
Recommended Setting: 60 seconds – Balances performance and functionality. Use 0 only if no frontend AJAX tasks are required.
- Backend Heartbeat Control
Enables control of the heartbeat API on the backend, such as the WordPress dashboard.
Recommended Setting: ON – To optimize server resources while maintaining essential admin tasks.
- Backend Heartbeat TTL
Specifies the interval (in seconds) for the backend heartbeat. Setting it to 0 disables backend heartbeats.
Recommended Setting: 60 seconds – To limit resource usage while allowing necessary admin operations.
- Editor Heartbeat
Enables control of the heartbeat API in the backend editor. Disabling this could stop auto-saving and other editor functions reliant on AJAX.
Recommended Setting: ON – To allow auto-save and real-time collaboration in the editor.
- Editor Heartbeat TTL
Sets the interval (in seconds) for the backend editor heartbeat. Setting it to 0 disables the editor heartbeat.
Recommended Setting: 15 seconds – Ensures editor functions like auto-saving work optimally.
Important Notes:
- Disabling Heartbeat – Setting TTL to 0 completely disables the respective heartbeat. Use this only if the functionality provided by the heartbeat is unnecessary for your site.
- Resource Impact – Longer intervals reduce server load, but critical WordPress tasks may fail if the interval is too long or heartbeat is disabled.
- Testing Required – After adjusting these settings, test your website for any broken functionality, especially on the frontend and in the editor.
With careful configuration, Heartbeat Control can significantly reduce unnecessary server activity while retaining essential WordPress features.
Keep WordPress Updated and Optimize Plugin/Theme Management
Keeping your WordPress core, plugins, and themes up-to-date is essential for maintaining website security, compatibility, and performance. Regular updates ensure that your site is protected from vulnerabilities and benefits from the latest features and improvements.
- Limit the Number of Plugins – Use only necessary plugins, especially if you’re on a shared hosting plan where server resources are limited. Excessive plugins can slow down your website and strain server resources.
- Theme Management – It’s recommended to keep just two themes installed—your active theme and a default WordPress theme as a fallback. This minimizes clutter and potential security risks.
These small but impactful steps go a long way in maintaining an optimized and secure WordPress site.
Wrapping Up
By following the strategies mentioned in this guide, covering cache optimization, database management, media handling, and adopting best practices for updates and resource management, you can significantly enhance your WordPress site’s performance and user experience.
Optimization is an ongoing process, so take the time to review your site’s needs and adjust your LiteSpeed Cache settings as necessary. With consistent effort, you’ll achieve better speed, reliability, and a seamless experience for your visitors.
If you encounter any issues or need assistance at any stage, feel free to reach out to TheBeeHost Technical Support. Our team is available 24/7 to help you resolve problems and guide you in optimizing your website for the best performance.
