cPanel is a popular tool used by many hosting providers to manage websites. It allows you to control all the important parts of your website from a single dashboard. One of the most common tasks in cPanel is adding a new domain (website) to your hosting account. This guide will walk you through the process of adding a domain, explain how to manage your files and subdomains, and help you get everything set up smoothly.
What Is an Addon Domain?
Before we dive into how to add a domain, let’s first understand what an Addon Domain is.
An Addon Domain is simply an additional domain (or website) that you add to your hosting account. It allows you to host more than one website using the same hosting plan. For example, you can have example1.com and example2.com both hosted on the same account, without needing separate hosting plans.
Let’s go over the simple steps to add a new domain to your cPanel account.
Ensure Your Domain is Pointing to TheBeeHost Nameservers
Before you add your domain to cPanel, you need to make sure that your domain is using the correct nameservers provided by TheBeeHost. This step ensures that your domain will start pointing to new nameservers across the DNS Servers globally.
- Log in to your domain registrar account (where you purchased your domain).
- Find the DNS settings or Nameserver settings for your domain.
- Change the nameservers to point to TheBeeHost. The nameservers are listed below.
cp1.therightservers.com
cp2.therightservers.com
cp3.therightservers.com
cp4.therightservers.com
Log into cPanel
- Once your domain is correctly pointed to TheBeeHost’s nameservers, log in to your cPanel account. You can usually do this by going to
your-already-hosted-domain.com:2083in your web browser. - Enter your username and password to access the cPanel dashboard.
OR - On the other hand you can directly login at your cPanel account from TheBeeHost Client Area.
Go to the “Domains” Section
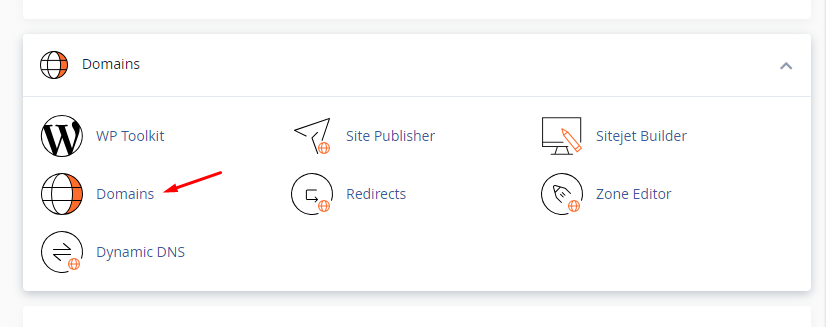
- Once you’re in the cPanel dashboard, look for the Domains section.
- Click on the Domains tool appears in Domains section.

Fill in the Domain Details
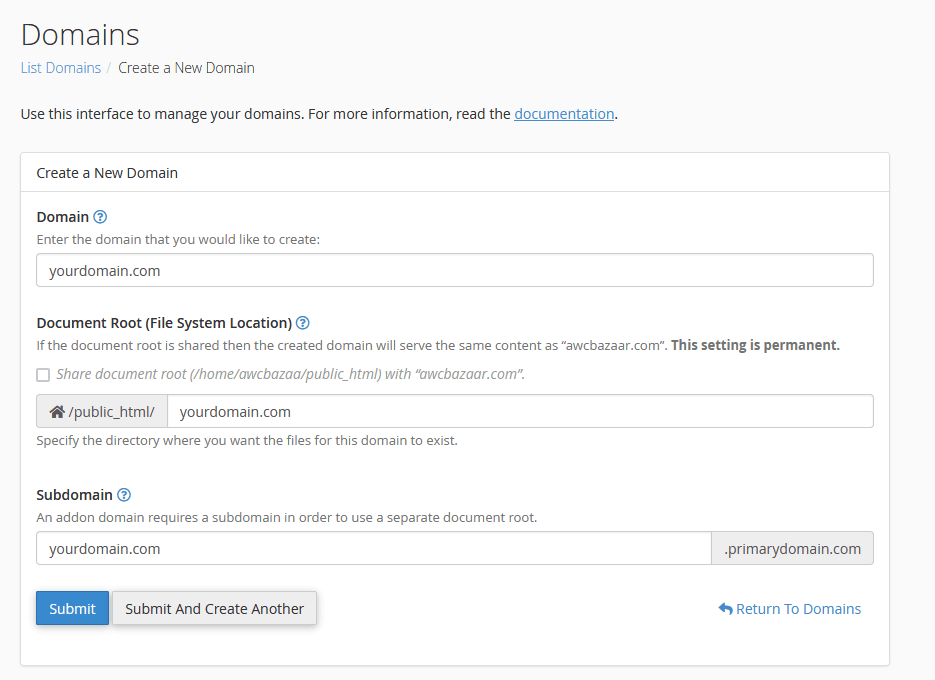
- Domain: In this box, type the full domain name that you want to add (e.g.,
newdomain.com).Note: This is the new website that you want to add. Make sure your domain is pointing to the right server before you add it here. - Document Root: This is the folder where all the files for your website will be saved. By default, cPanel will create a folder in public_html (e.g.,
public_html/newdomain.com). If you prefer to store the files somewhere else, you can change this folder name.Note: The Document Root is where your website files will be located. You can choose a custom folder if you want, but if you don’t change it, cPanel will create a folder for you under public_html. - Subdomain: This field will automatically fill in with part of your domain name (e.g.,
newdomainfornewdomain.com). This is a required field, and it cannot be skipped.Note: The Subdomain is created automatically by cPanel. It links your domain to the folder where your website files are stored. For example, if you addnewdomain.com, cPanel will create a subdomain likenewdomain.primarydomain.com. You can change the name if you want, but it is necessary for the system to work.
Add the Domain
- After filling out all the fields, click Submit.
- cPanel will now create the necessary files and folders for your new domain.
Final Thoughts
Adding a domain to your cPanel account is easy once you know the steps. With just a few clicks, you can set up a new website on your hosting account. Make sure your DNS settings are correct and that the subdomain creation doesn’t cause any problems with your domain.
By following these steps, you’ll be able to manage multiple websites on your hosting account without any trouble.
If you need help or have any questions, feel free to contact TheBeeHost support through live chat or a support ticket.
Install WordPress Effortlessly
Get started with just a click and build your dream website today!

